Tools, parts and what you need for guitarmaking

-
Tools & Jigs
-
Tools
- Fretting Tools (Base)
- Pliers
- Sanding Blocks
- Brushes
- Files
- Routers
- Routing Templates
- Templates / Straight Edges
- Fretting Templates - Fret Scale Templates
- Clamps
- Knives
- Measuring Tools
- Tool Sets
- Reamer
- Keys, Wrenches
- Drill Jigs
- Saws
- Drill Bits
- Scrapers
- Bending Irons
- Other Tools
- Fret Hammer
- Fret Pressing
- Fretboard Protector
- Fret Bender & Tang Nipper
- ... More
- Jigs for Luthiers
-
Tools
-
Hardware & Parts
- Necks & Bodies
- Tuners
-
Hardware / Parts
- Truss Rods
- Carbon / Titan Reinforcement
- Trussrod Nuts
- Washer for truss rods
- Bridge Pins
- End Pins
- Bridges & Tailpieces E-Guitar
- Bridges & Tailpieces
- Covers
- Pickguards / Scratch Plates
- Strap Locks
- Bridge Accessories / Spare Parts
- Screws, Nuts, Washers
- Neck Attachement
- String-Ferrules
- Jack plates
- Control Plates
- String Retainer / String Trees
- knobs (pots/switch)
- Relic Parts
- ... More
- Nuts & Saddles
- Fret Wire
- Pickups & Electronics
- Materials & Supplies
- How-to
- Guitar Making
Shop Startpage Guitar Making Repairs Classical Guitar Repairs Classical Bridge Replacement
Classical Bridge Replacement
Here I show the repair of a bridge of a classical guitar, also showing how the bridge is made
Bridges on classical guitars do not have to offer the same resistance as steel strings. The gut strings used on classical guitars do not build up such enormous string tension and also do not notch the saddle inlay as much. When damage to bridges occurs, it is usually due to the top gluing coming apart or the wood of the bridge itself being damaged (e.g. cracks along the wood grain). In the case of the specimen shown here, the owner was probably very eager to do his own work and replaced the broken knob bridge part with a stiletto construction.
The only thing that can help here is a complete replacement. With a hot knife, you carefully detach the bridge. You work your way slowly from one corner all the way around, taking special care not to splinter the ceiling wood when you lift it off.
 |
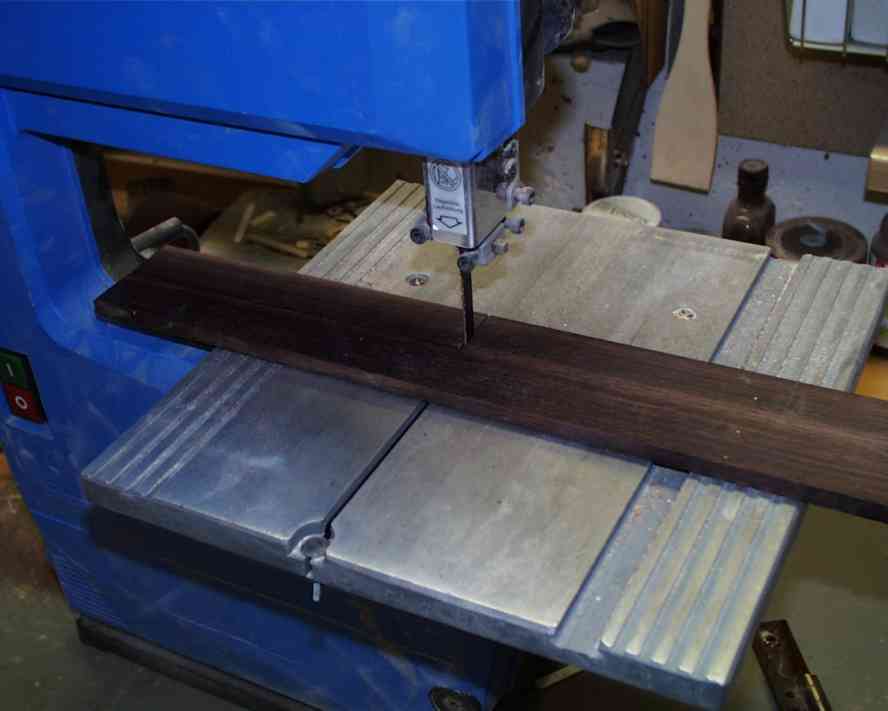
The outer dimension of the old bridge (29.5x190) is marked onto a 10mm thick piece of rosewood and cut out with the band saw.
 |
Using a fine saw, cut about 6mm deep to the left and right of the center piece. To make sure you cut perpendicularly, it helps if you clamp an angled piece of wood to the sawing point. The width of the center piece is predetermined by the string inlay. The plastic piece measures about 82x2.2x10mm.
 |
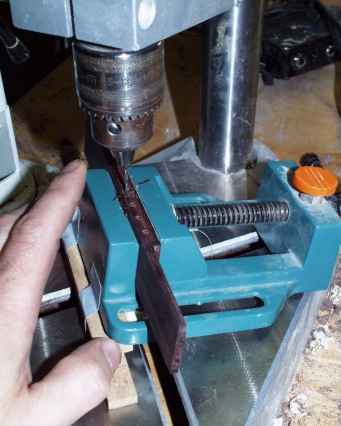 |
The next step is drilling the string holes 6, each 1.5mm thick and 11,4mm apart. It is helpful in this case to provide the vice far inclined that the drill at about 2.5mm enters from behind and re-emerges in the middle part at 4.5mm.
 |
Now file the rounded transitions on the front and back of the center section.
 |
The side parts are also rounded with the file.
 |
A bevel is applied to each side panel and everything is then sanded again with sandpaper to 240 everything.
 |
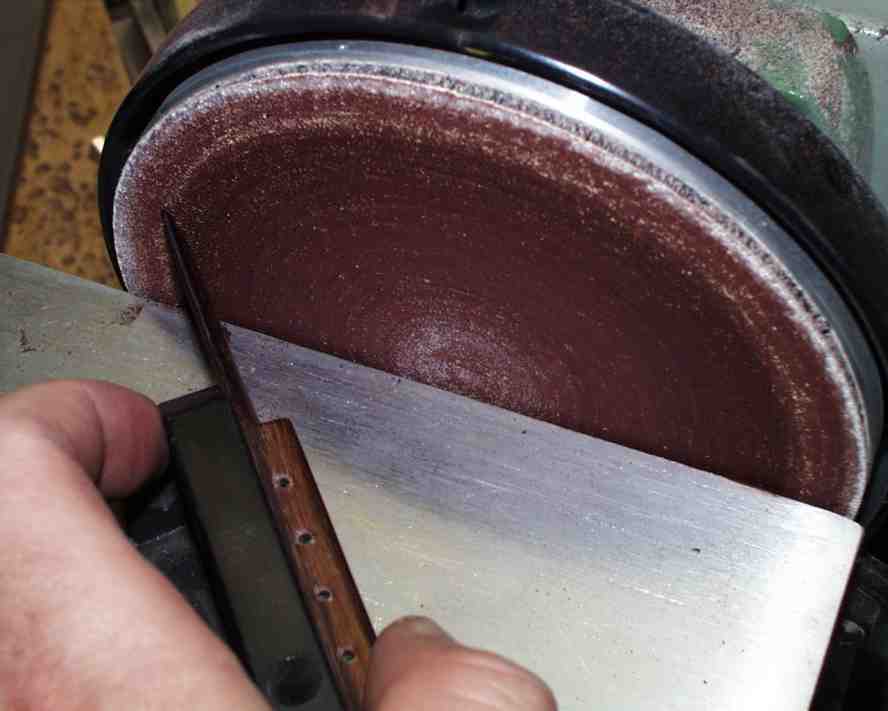
The bar is polished to a shine on the coarse polishing wheel and is thus ready for gluing.
 |
With quick clamps and white glue, the new bar is glued exactly on the surface of the old one.

|
Rall Guitars & Tools Hauptstrasse Tel +49 (0) 8803-48856-56 Retail Shop: By appointment only
|
Subscribe our Newsletter By subscribing our newsletter you accept our Privacy Policy and Terms and Conditions. |