
Shop Startpage Guitar Making Techniques Polishing Menzerna Polishing Compound
Polishing with Discs and Waxes
High-quality goods that shine appear more valuable. Everyone who looks at the jewels of kings in museums or is impressed by a pleasant marble facade in Tuscany knows this. "Clothes make the man". This is also the main reason why a lot of attention is paid to the surface, the finish of the instruments, and the instrument gains value from a perfect surface - or loses value if it is not right - even if it sounds good.
High-gloss lacquered surfaces do not look after drying as we are used to from high-gloss surfaces on e.g. guitars or pianos. This leads to the question of where the gloss comes from. It is quite simple: "if the depressions in the surface are smaller than the wavelength of visible light, then the surface is shiny". So the gloss depends on how many peaks and valleys make up the paint layer and how large they are. A surface is matt when it is evenly covered with the smallest irregularities. If you have simply added dust to the paint or scratches, then this is partial and it does not shine in these places.
As the headline suggests, this site is about polishing with polishing wheels and polishing wax, also called buffing. German instrument making has high tradition and experience in polishing, this is surely the reason why German polishing products set the quality standard here.
The polishing waxes from Menzerna should be mentioned, as well as polishing wheels made of seamless, soft flannel like those used by large musical instrument manufacturers. The polishing wheels mentioned have a diameter of 300mm and reach their most effective working speed at just under 2800 rpm. Due to its special folding, the fabric has high oscillation, i.e. movement transverse to the direction of rotation, and cools the polishing area, thus accelerating the polishing process. From my own experience and customer feedback, I can tell you that there are significant differences in the quality and intended use of polishing wheels. Standard car polishing wheels or even those for polishing metals, will probably not lead to a satisfactory polishing result.
The polishing wheels can be mounted twice next to each other or used individually with a width of about 30-35mm for polishing. In any case, a separate polishing wheel is recommended for each polishing stage (pre-polishing or gloss polishing).
Polishing wheels are operated on so-called polishing stands. Often several discs are mounted next to each other as a package. In addition to flange mounts with e.g. 19mm / 30mm shafts, these often have tapered left-hand threads, so that wheels can be mounted without a mounting tool and can also be changed quickly. Polishing jigs must be powerful (>1kW) and able to accommodate the diameter and wheel thickness. A polishing wheel directly on the output shaft of an electric motor also does a good job.
For economical use in the hobby area, you do not necessarily have to get a polishing trestle - a setup with a robust drilling machine and appropriate work safety measures and caution is sufficient. This works by attaching a large polishing wheel ("Polishing wheel seamless 30mm bore" Art. No. 10020006) to a drill via an adapter ("Drill attachment 30mm" Art. No. 10020007), for example, and polishing the matt ground surface to a high gloss in two passes.
Preparation of the discs:
The disc must be trimmed before the first use. This term refers to the preparation of the fibers so that they are uniform in size and can absorb the polishing wax.
This is done by running the disc at nominal speed (max. 2800 rpm), holding the scraper ("Polishing disc cleaner made of all-steel" art. no. 10020009 ) a few millimeters deep against the disc (hold on tight!! Danger of accident!!) and thus striking about 1-2mm of the flannel material. The polishing wheel cleaner is also used to warm up the wheels before polishing, cleaning and fluffing up the polishing material.
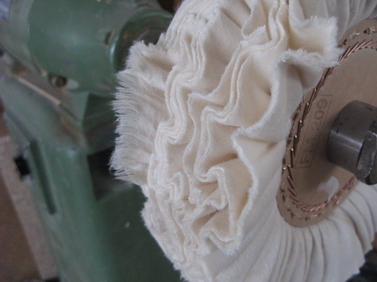 |
To achieve a uniform polishing result, the polishing surface of the disc should be straight. Some threads, for example on the sides of the wheel, protrude at the beginning and form a U shape.
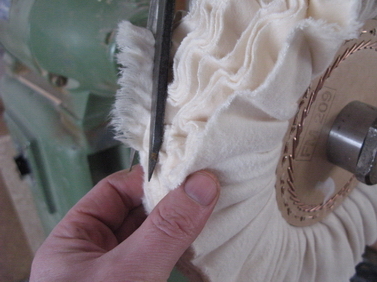 |
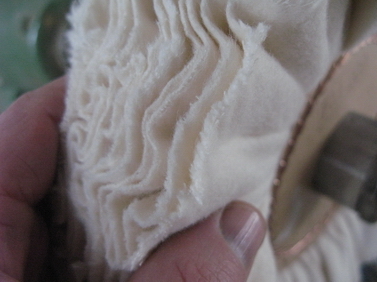
You then have to stop the disc and look for these irregularities and cut them off (trim) with the scissors. These are usually only a few corners and threads. The disc is pressed together with the fingers to detect differences. If you find areas that have not yet been cut open next to those that have, the latter are higher and need to be trimmed back a bit.
 |
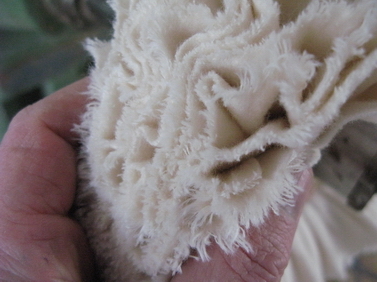 |
Trimming is complete when the polishing surface appears flat and the entire circumference of the disc is evenly covered with soft, short filaments. Now you can begin to apply polishing wax. To do this, the wax is held briefly against the rotating discs and now the instrument can already be polished.
Attention: the direction of rotation of the drive motor must point so that the disc turns towards the floor and the nut of the adapter does not open. Also check the fastening of the whole apparatus, e.g. on the workbench.
The goal of a paint polish is to create an even and smooth surface. The following steps are necessary for this:
- Painting surface with a high-gloss finish
- Allow the coating layer to dry through. This is very important! Some varnish manufacturers say that the varnish is dry after 24h or shorter. This really depends on the test on it and I unfortunately I could not always confirm. Especially in wood with many pores such as mahogany or Palisaner, the varnish dries only gradually in the pores and thus "falls in". If you polish too early, the uniform gloss lasts only a short time. At room temperature, you can certainly take 3-4 weeks drying time with nitro.
- Sanding the varnish with water sandpaper 800 followed by 1200. Appropriate caution with water on wood! It flows into all cracks and can lead to cracks - just in screw holes, freely scraped glue surfaces on the bridge or neck, etc.
- Pre-polishing with pre-polishing wax brown ( "Menzerna Polishing Paste Pre-polishing" Art. No. 10020001 )
- High-gloss polishing is almost always possible with the light beige polishing wax ( "Menzerna Polishing Paste Gloss" Art. No. 10020002 ) or if you are polishing particularly demanding paintwork (such as black), then use the somewhat drier ivory polishing wax ( "Menzerna Polishing Paste Super Fine" Art. No. 10020003) instead.
- In places inaccessible with the discs or to remove minor scratches, use the "Manzerna special polishing cream in tube" art. no. 10020004 by putting a little of it on a soft polishing cotton and rubbing it in with light pressure.
- Removal of polishing residues from cavities such as sound hole, machine head holes, etc.
One stick of polish is certainly enough for polishing 20-30 guitars!

|
Rall Guitars & Tools Hauptstrasse Tel +49 (0) 8803-48856-56 Retail Shop: By appointment only
|
Subscribe our Newsletter By subscribing our newsletter you accept our Privacy Policy and Terms and Conditions. |