Tools, parts and what you need for guitarmaking

-
Tools & Jigs
-
Tools
- Fretting Tools (Base)
- Pliers
- Sanding Blocks
- Brushes
- Files
- Routers
- Routing Templates
- Templates / Straight Edges
- Fretting Templates - Fret Scale Templates
- Clamps
- Knives
- Measuring Tools
- Tool Sets
- Reamer
- Keys, Wrenches
- Drill Jigs
- Saws
- Drill Bits
- Scrapers
- Bending Irons
- Other Tools
- Fret Hammer
- Fret Pressing
- Fretboard Protector
- Fret Bender & Tang Nipper
- ... More
- Jigs for Luthiers
-
Tools
-
Hardware & Parts
- Necks & Bodies
- Tuners
-
Hardware / Parts
- Truss Rods
- Carbon / Titan Reinforcement
- Trussrod Nuts
- Washer for truss rods
- Bridge Pins
- End Pins
- Bridges & Tailpieces E-Guitar
- Bridges & Tailpieces
- Covers
- Pickguards / Scratch Plates
- Strap Locks
- Bridge Accessories / Spare Parts
- Screws, Nuts, Washers
- Neck Attachement
- String-Ferrules
- Jack plates
- Control Plates
- String Retainer / String Trees
- knobs (pots/switch)
- Relic Parts
- ... More
- Nuts & Saddles
- Fret Wire
- Pickups & Electronics
- Materials & Supplies
- How-to
- Guitar Making
Shop Startpage Guitar Making Tools Binding Jig
Tools: Binding Jig
Here I show a homemade jig for clean and accurate routing of the binding on guitars.
Who does not know this: you put the router on the guitar top and meticulously set the depth and width of the cutter on test woods to match the desired binding and then you mill - and the purflings do not fit at the back and front! Most of the time, this is because the support surface of the router is not at right angles to the desired routing channel. At the points where the angle between the router and the support was steepest, you have the deepest channel and then the thickness of the binding material is no longer sufficient, which is then usually at the expense of the frame wall thickness. If you look at the top or back of an acoustic guitar, it's easy to see the curvature, and it's even more noticeable on jazz guitars. You can always choose the binding so thick that it protrudes, but to the master's eye the result is just nothing.
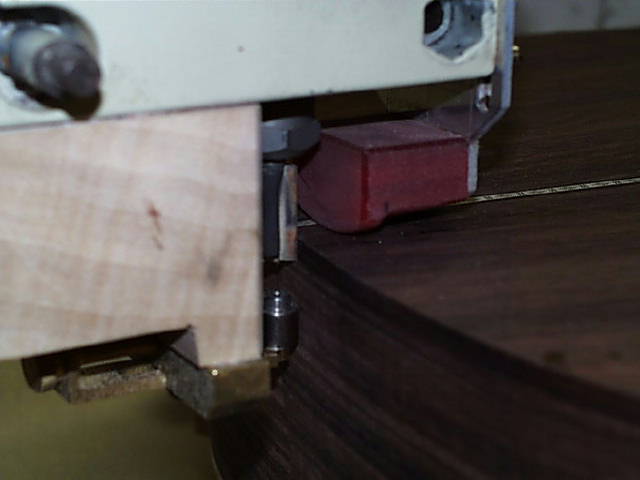
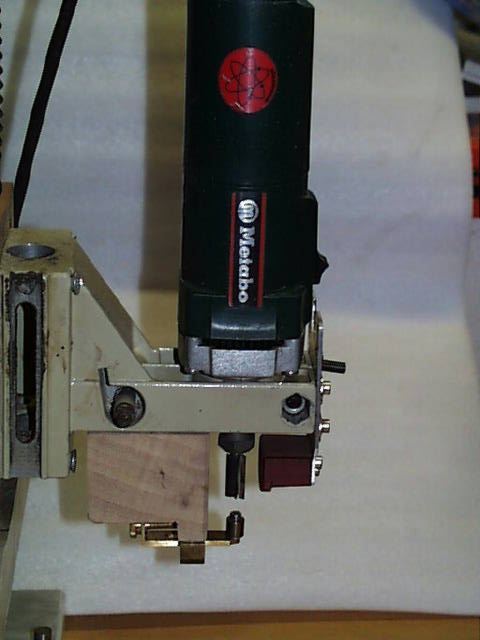
In simple terms, my jig is nothing more than an "upright holder" for the router and a holder with rollers for moving the guitar horizontally and easily while routing. Horizontally (up/down), the router is guided by means of a shoe that rests near the edge on the outer contour and follows it in height. The width of the milling channel (i.e. how much wood the cutter takes away on the circumference = thickness of the binding) is adjusted by the infeed unit. This is a roller with the diameter of the cutter that is fed by means of a knurled screw just below the barrel. If the outer contour of the roller closes with that of the cutter, there is no removal, if the roller is 1mm behind, the milling width is 1mm. I use a cutter Ø10mm.
The channel becomes so really good with approach cutters, which have appropriate ball bearings mounted. I have such also in the offer. If one uses this, the adjustable counterholder for the milling depth is omitted.
19110002 Set of multi-binding cutters carbide with 8mm holder, screws, allen key and 8 thrust rings for bindings with 1mm; 1,5mm; 2mm; 2,5mm; 3mm; 3,5mm; 4mm; 5mm spacing
I divide the description of the device into the following sections:
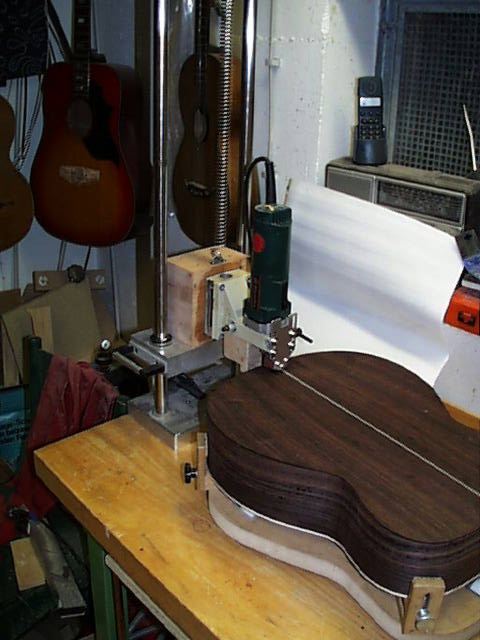
Construction guitar holder:
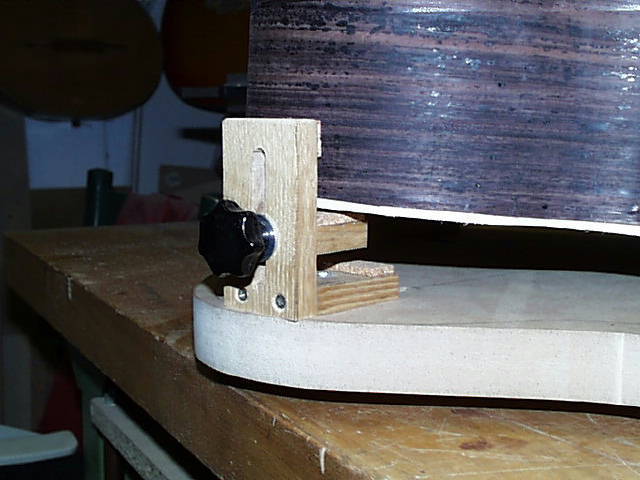
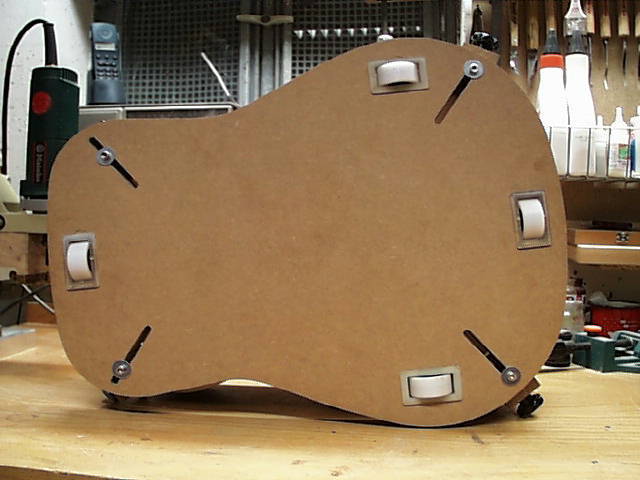
The bracket consists of a 28mm thick MDF board , 4 rollers on the bottom and 4 two-way adjustable holders. The top of the guitar should be as horizontal as possible. To ensure this, you need adjustable supports in height because almost all guitars are thinner at the base of the neck than at the end of the body. On the other hand, the guitar body must sit tightly in the support and you need a certain range of movement to exert pressure on the guitar sides from the side. In the left picture you can see the height adjustment well, to protect the surface I glued small pieces of cork with UHU. On the right picture you can see the outer contour and the oblong holes for clamping the guitar, which point to the middle. The shape is a bit bigger than the dreadnought guitar and the long holes are long enough to clamp a 3/4 guitar. The rollers are arranged in a circle, so it's easy to rotate the thing, moving it on the other hand is a bit difficult, but it's hardly ever needed. My rollers are built-in rollers and there is about 10mm gap under the board.
 |
 |
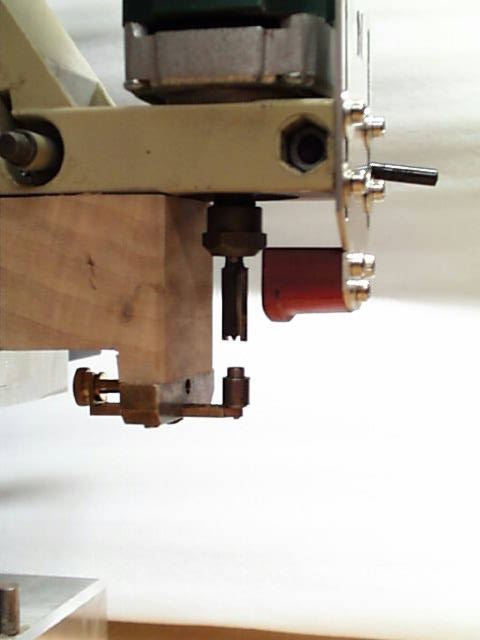
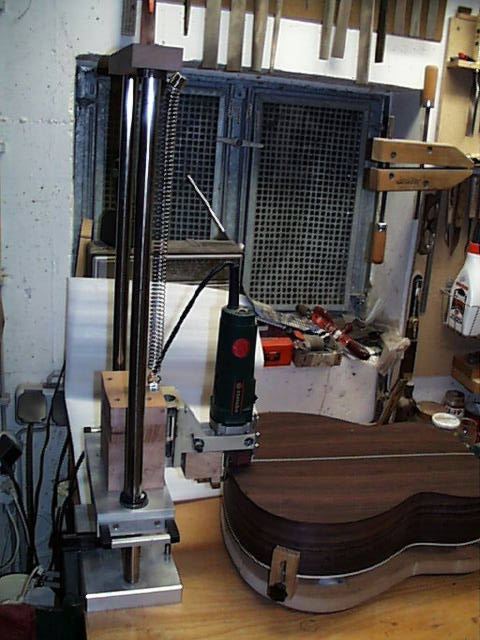
Milling device structure:
Between two column guides (which I pulled out of a "well sorted" scrap container) is a Ø43mm mount for my standard router. I sacrificed my old drill stand for this and set the mount in a piece of hardwood (screwed and epoxied). The guides allow the router to move up and down. A spring between the columns holds the weight of the router unit just enough to apply enough back pressure to the router force and not damage the wood of the ceiling (500g). The depth and width of the milling channel are adjusted on adjustable counter holders as described at the beginning. The shoe, which can be seen in red on the pictures, can be adjusted up and down by means of a slotted hole, only a small part really serves as a support, the rest was ground free... With two screw clamps I fix the jig on the workbench.
 |
 |
 |
 |
 |
Since using this jig and router kit, I no longer have a need for handheld routing operations with uncertain outcomes. With a little effort to make the jig, you save yourself heaps of muscle grease to rework and the adrenaline level stays at a comfortable level.
- Be careful when milling at the upper and lower carcase width. Here, the milling cutter can chip off entire parts of the top or bottom along the annual rings. Always mill along the annual rings ("downhill"). To protect against this, brush the areas with hide glue and allow to dry, or simply mill with deliberately low chip removal and in synchronization. Always reposition the body for milling accordingly.
- It is safest to start milling the binding channel at the base of the neck, as any misalignments can still be hidden by the neck.
- As little reworking as possible on the glued-in binding, as it tends to come off again during sanding, planing, etc.!
- You can mill without the lower infeed unit if the milling depth is preset via ball bearings attached to the milling cutter (19110002).
- Always test the depth and width beforehand on test woods and then only on the guitar!!!
- Usual binding thicknesses are 0.5mm, 1mm, 1.5mm, 2mm; the Herringbone stripe has 3mm.
- The longest lasting are carbide tipped wood cutters.
- You can also use this jig to mill away binding that is no longer needed, if you have to remove the blanket afterwards.

|
Rall Guitars & Tools Hauptstrasse Tel +49 (0) 8803-48856-56 Retail Shop: By appointment only
|
Subscribe our Newsletter By subscribing our newsletter you accept our Privacy Policy and Terms and Conditions. |