Tools, parts and what you need for guitarmaking

-
Tools & Jigs
-
Tools
- Fretting Tools (Base)
- Pliers
- Sanding Blocks
- Brushes
- Files
- Routers
- Routing Templates
- Templates / Straight Edges
- Fretting Templates - Fret Scale Templates
- Clamps
- Knives
- Measuring Tools
- Tool Sets
- Reamer
- Keys, Wrenches
- Drill Jigs
- Saws
- Drill Bits
- Scrapers
- Bending Irons
- Other Tools
- Fret Hammer
- Fret Pressing
- Fretboard Protector
- Fret Bender & Tang Nipper
- ... More
- Jigs for Luthiers
-
Tools
-
Hardware & Parts
- Necks & Bodies
- Tuners
-
Hardware / Parts
- Truss Rods
- Carbon / Titan Reinforcement
- Trussrod Nuts
- Washer for truss rods
- Bridge Pins
- End Pins
- Bridges & Tailpieces E-Guitar
- Bridges & Tailpieces
- Covers
- Pickguards / Scratch Plates
- Strap Locks
- Bridge Accessories / Spare Parts
- Screws, Nuts, Washers
- Neck Attachement
- String-Ferrules
- Jack plates
- Control Plates
- String Retainer / String Trees
- knobs (pots/switch)
- Relic Parts
- ... More
- Nuts & Saddles
- Fret Wire
- Pickups & Electronics
- Materials & Supplies
- How-to
- Guitar Making
Shop Startpage Guitar Making Tools Dovetail Template
Dovetail Template - Device for Precise Cutting of Guitar Neck
On this site I show my router jig for attaching the neck to acoustic guitar bodies.
There are quite a few different possibilities. A basic distinction is made:
- Screw (cheap, often sound loss)
- Wood joints
- dovetail
- Straight groove connection
- Dowel connection
- Combinations of both techniques
- Fix stump with high-tech adhesives (cheapshot, not to imitate!)
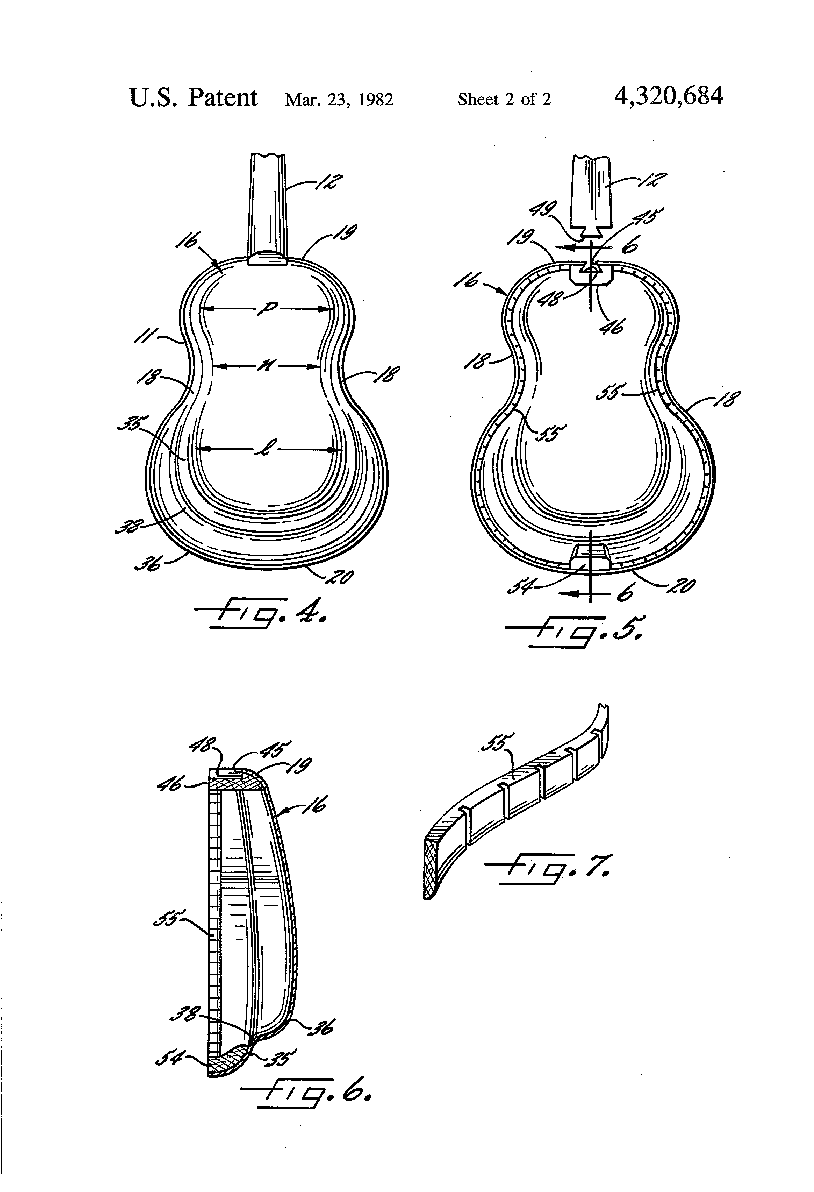
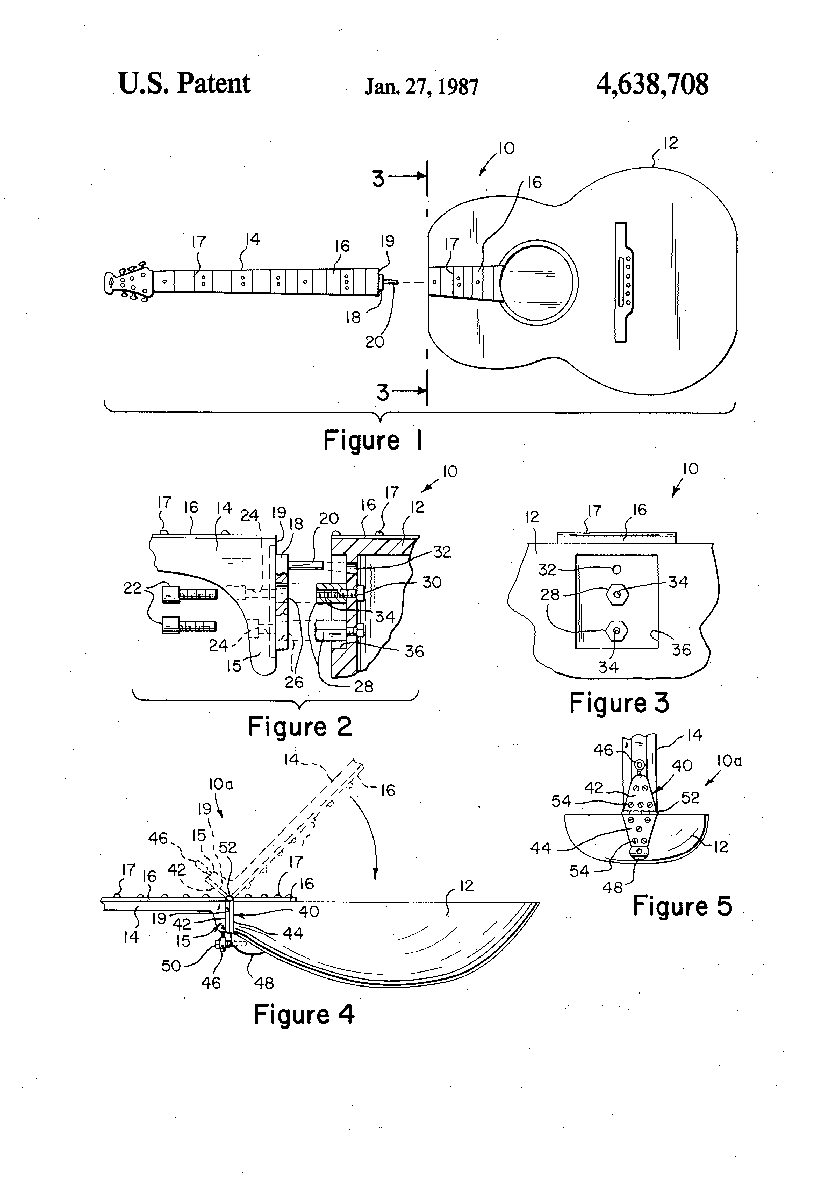
Some of these compounds are protected by patents. The company C. F. Martin, for example, has had its way protected under the US patent number US005461958 in 1995. It is a combination of a straight groove connection and a screw connection. A wide slot in the neck block and a screw hole are located in the guitar body, the counter pin and a metal setting nut are located on the neck itself. Taylor, Kaman and other companies also protect their production methods from easy copying in this way.
Examples of Patent Drawings:
 |
 |
 |
The old forms, which took a lot of time and skill to execute, such as the dovetail joint, can be used at any time without infringing rights, to the best of my knowledge.
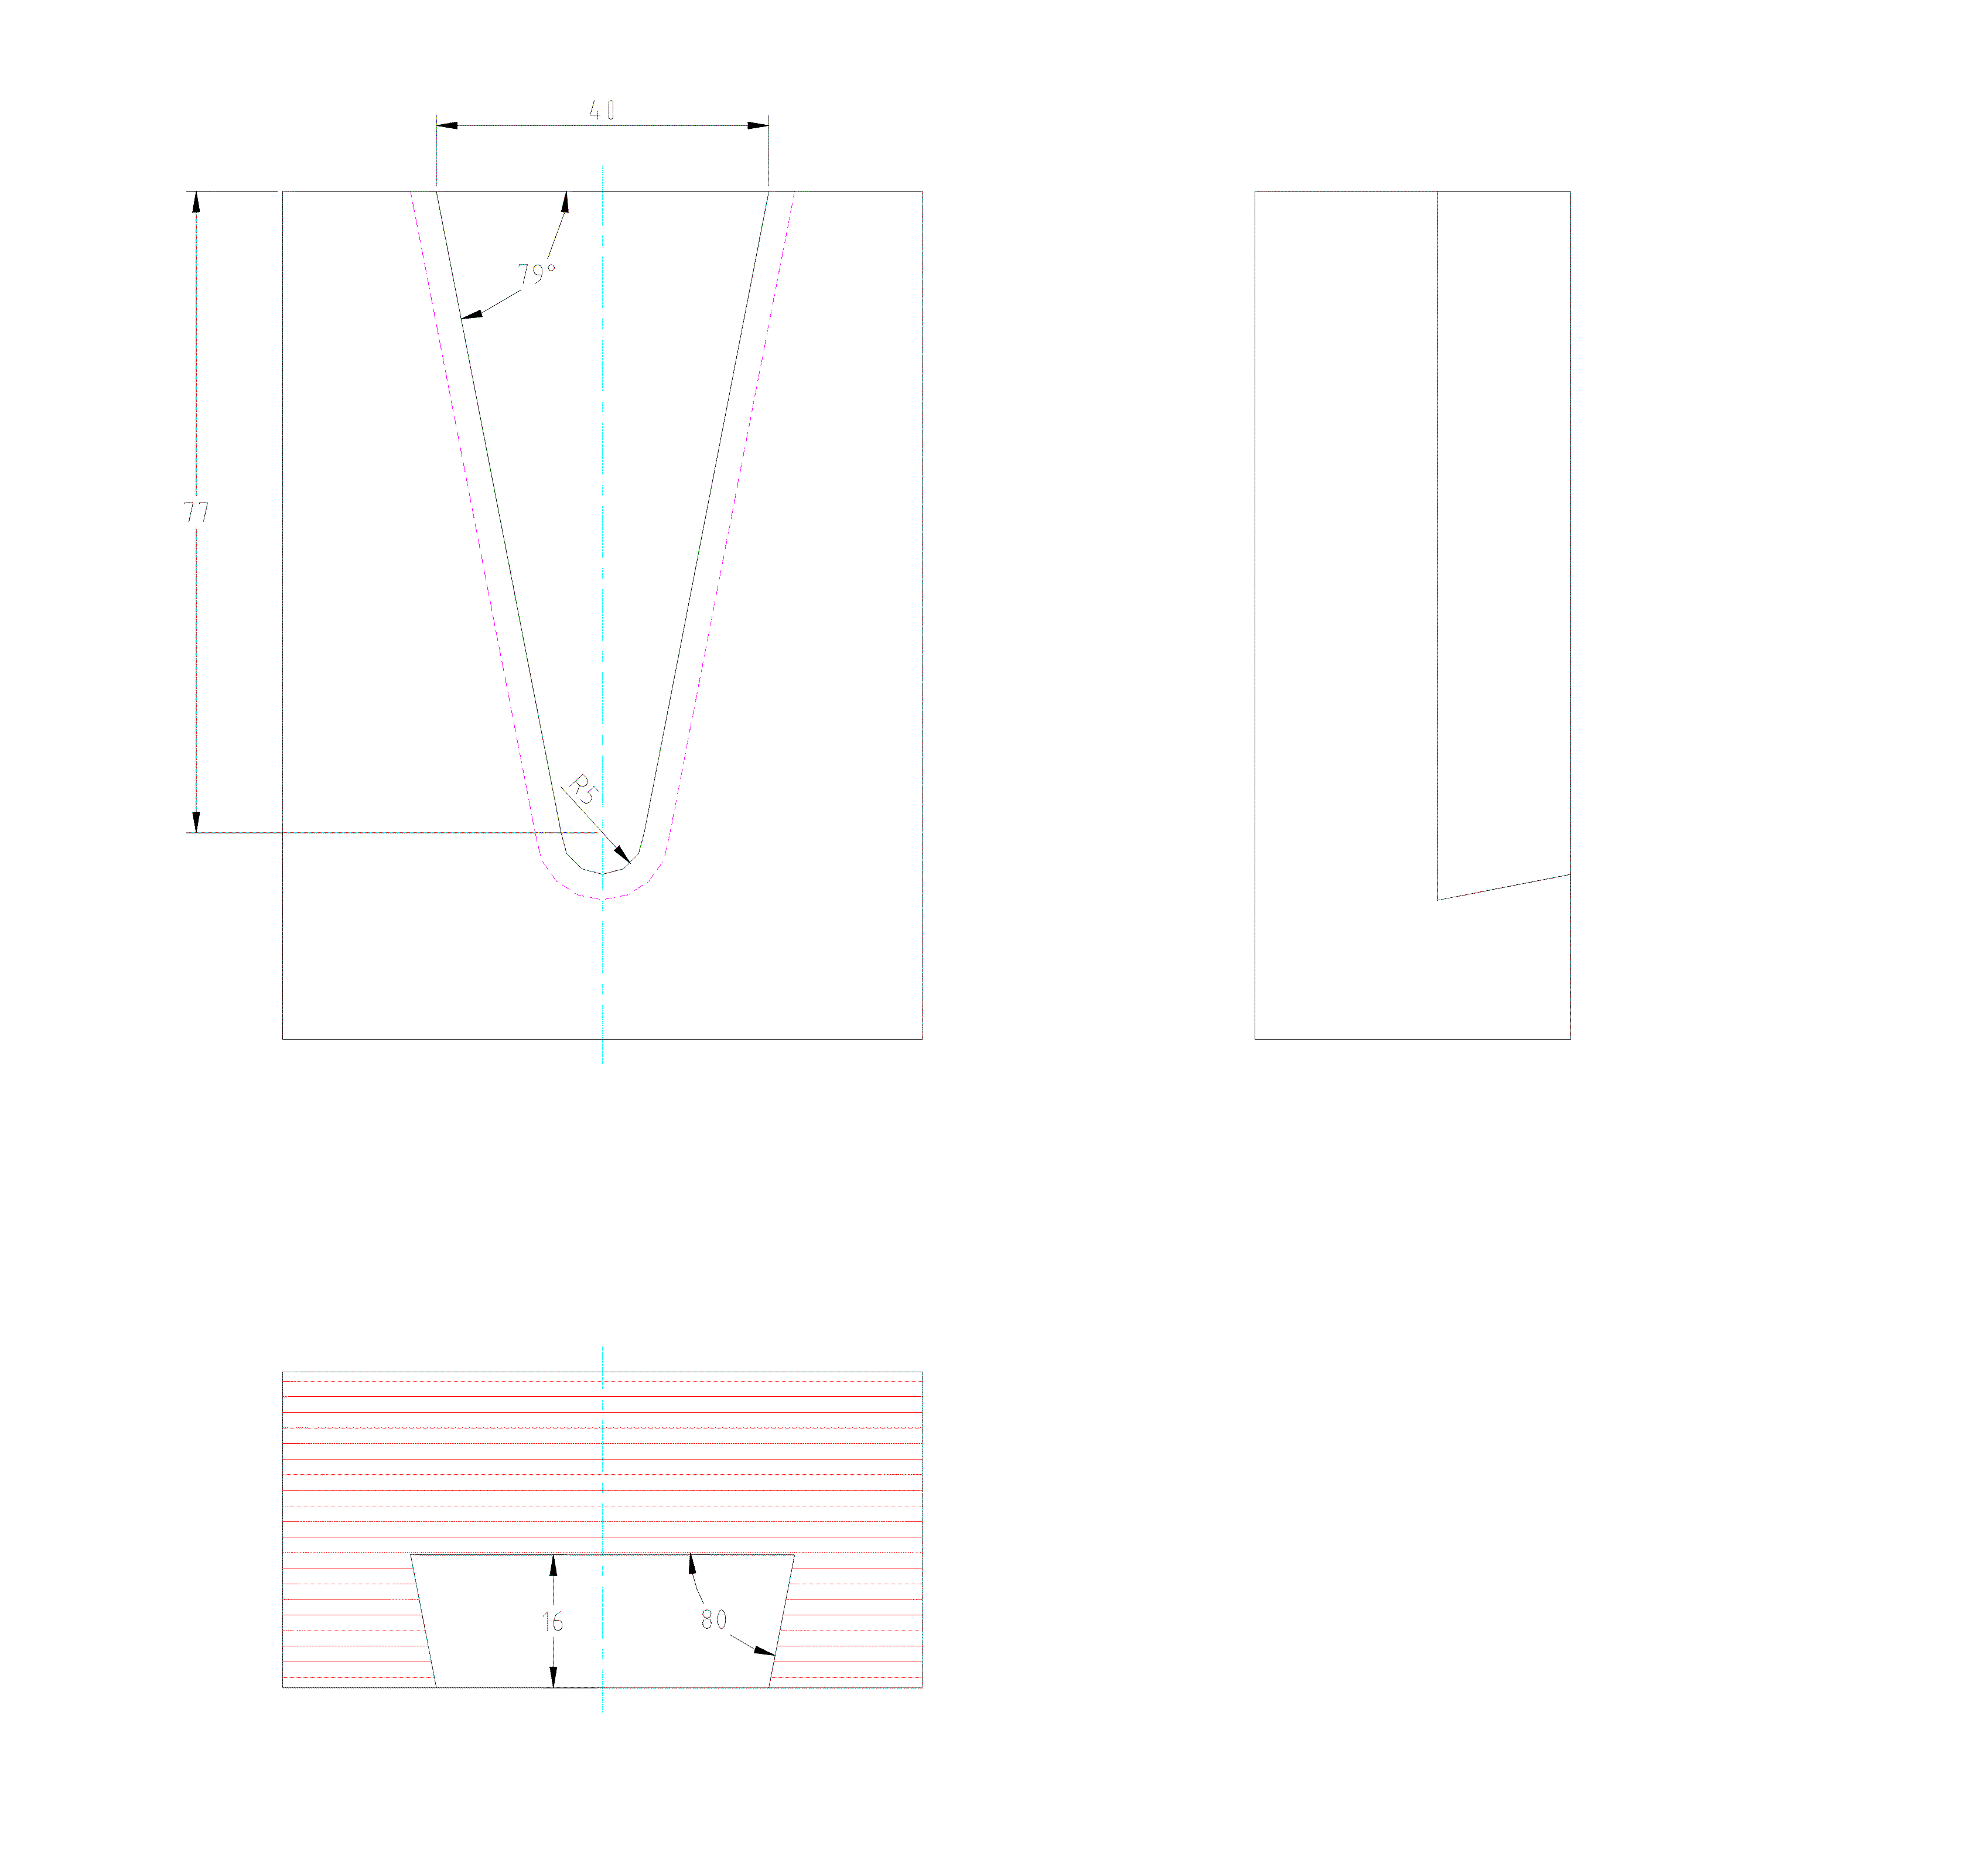
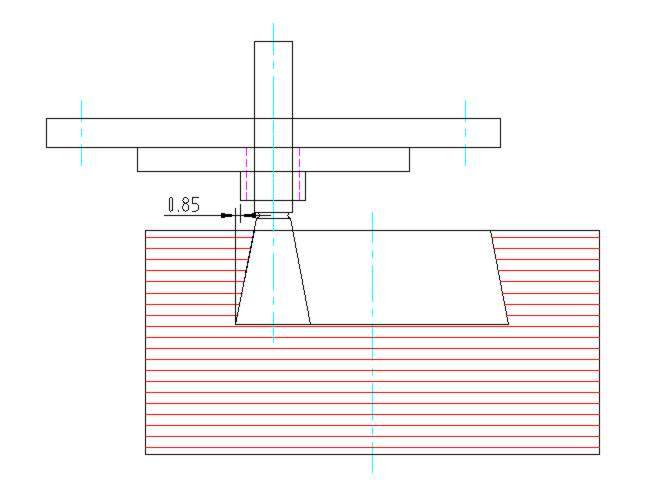
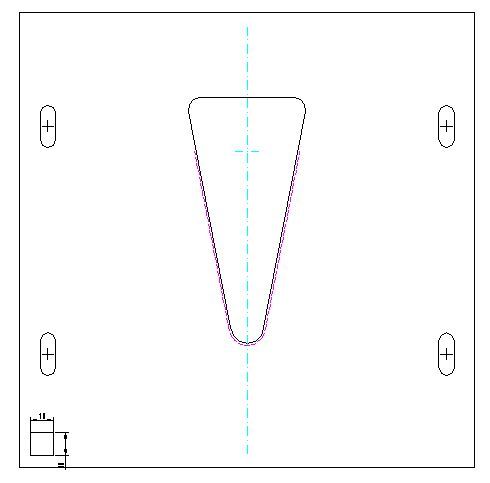
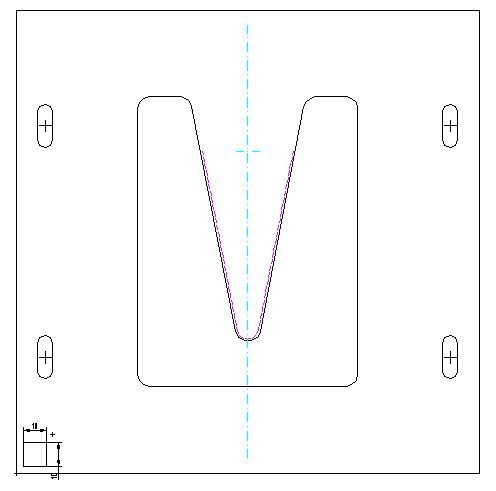
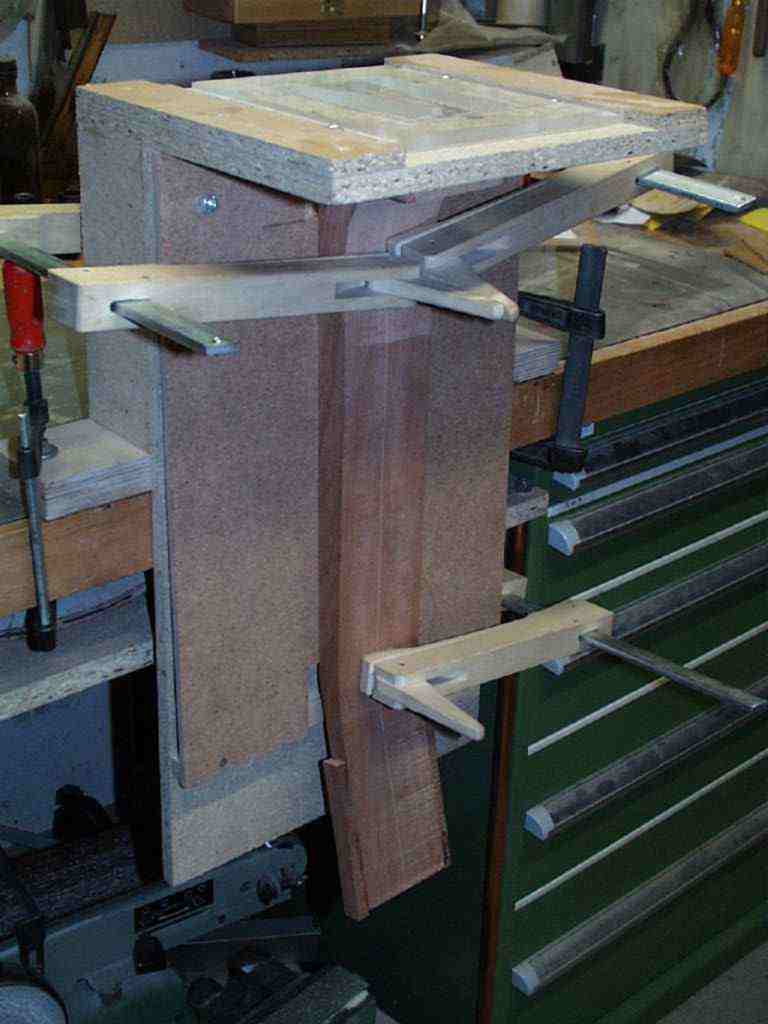
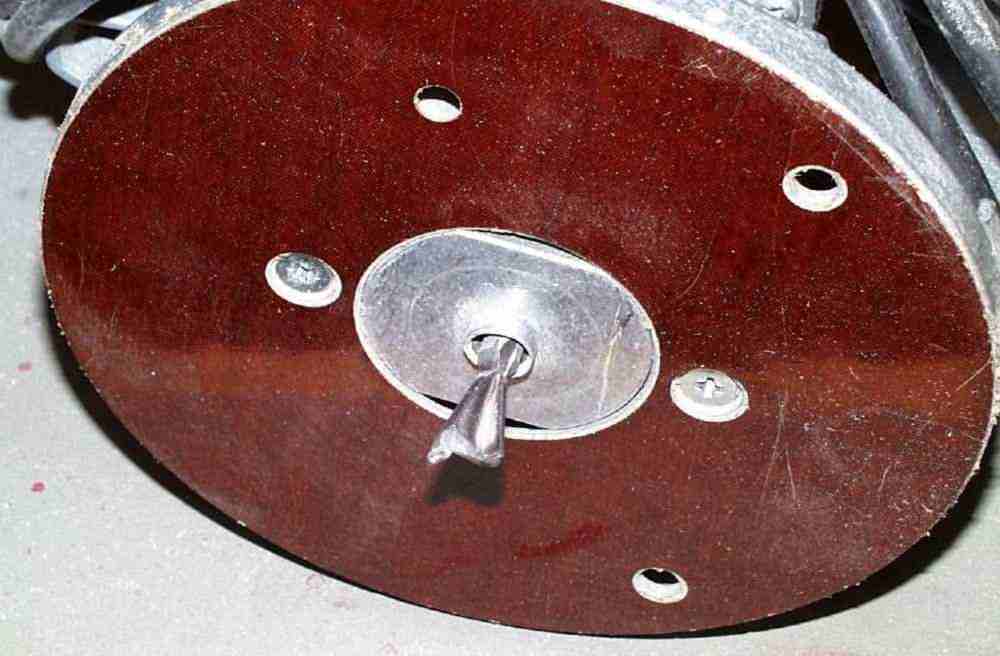
The now following device achieves a steel string approach which was also used by the C. F. Martin company for decades. It is a so called dovetail joint. Since this type of wood joint has been used in numerous variations since ancient times, it is not an invention of the instrument makers from the USA, but has become a kind of industry standard through multiple use and imitation. Especially in the repair one meets again and again the size, for me therefore a reason to decide also for it. In the past, these connections were made with great craftsmanship and skill using saws, chisels and knives. Of course, today this is only done in vocational schools to train the trainee the basis, in normal production, of course, you use milling tools. I use a router with an 80° tine cutter for this. I guide this along a Plexiglas template by means of a thrust ring.
 |
 |
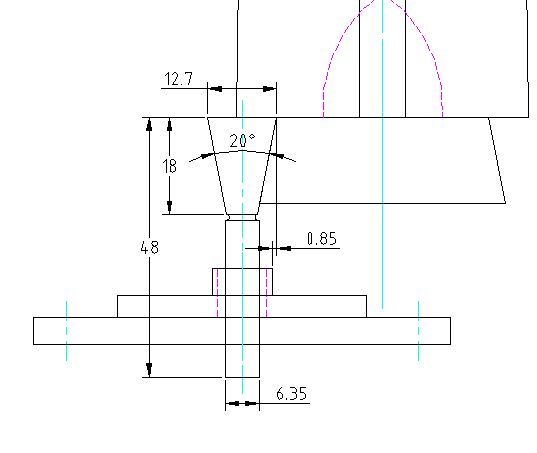 |
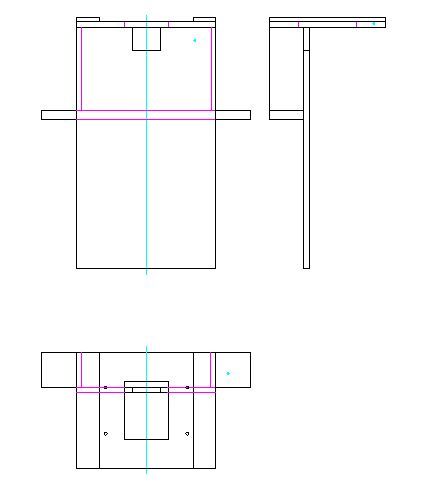
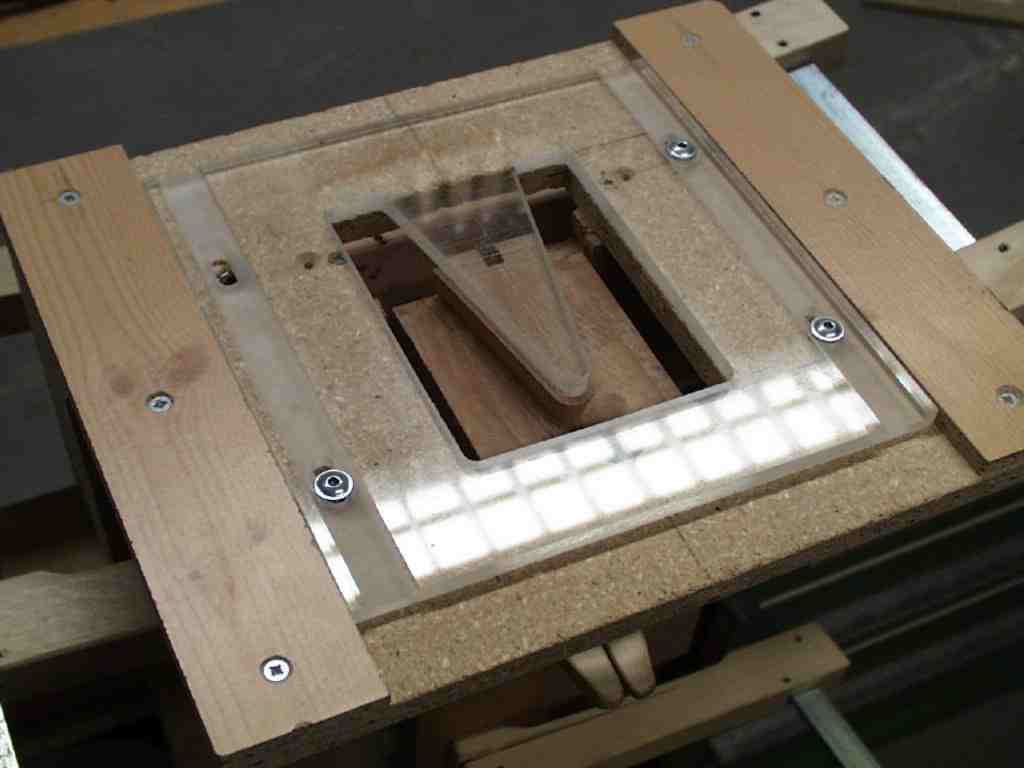
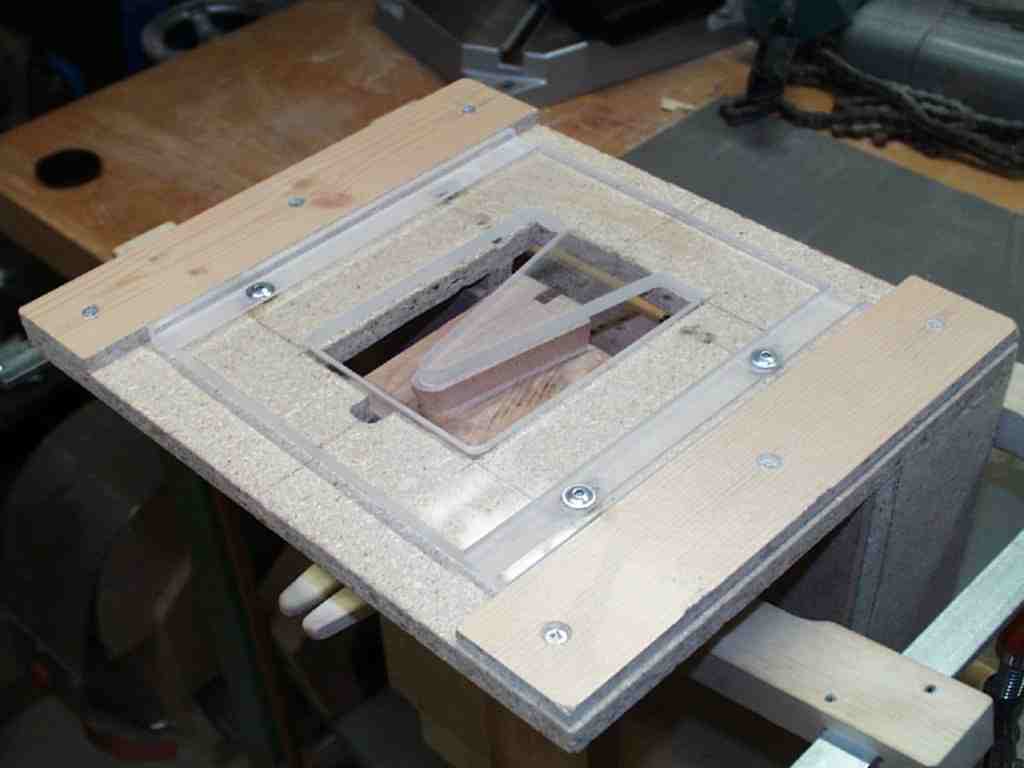
The jig requires two templates, one for the neck, one for the neck block. The cutouts on the templates are adapted to my Metabo router with a Ø11mm thrust ring and the groove cutter (see picture above). As a support for the router serves a simple wooden construction that is best made of plywood. This construction is then fixed to the workbench with two screw clamps. On the base plate one makes then with screw clamps (Klemsa) the milled part firmly, either the guitar body or the neck. One needs for the manufacture:
 |
| Dimensions | piece | Remark | |
| Baseplate | 520x300x12 | 1 | Cutout 60x60 |
| Stencil plate | 300x250x12 | 1 | Neck 95x125 |
| Mounting board | 450x75x20 | 1 | |
| Bracing board | 180x75x12 | 2 | |
| Template guide | 250x48x8 | 2 | Plastic coated wg. Sliding properties |
| Locknuts | M5 | 4 | Mounting and alignment template |
| Stencil material | 200x200x8 | 2 | PMMA (plexiglass) |
I made the stencils as follows. I drew the outline and glued this drawing with nonpermanent spray adhesive to the template material at the exact angle. With the fretsaw, files and sandpaper I gradually approached the final contour. With this method, one achieves a very high accuracy, but it is also time consuming. With a scribing needle I marked the center lines, these I also drew on the template plate and and can thus set the angular position exactly.
 |
 |
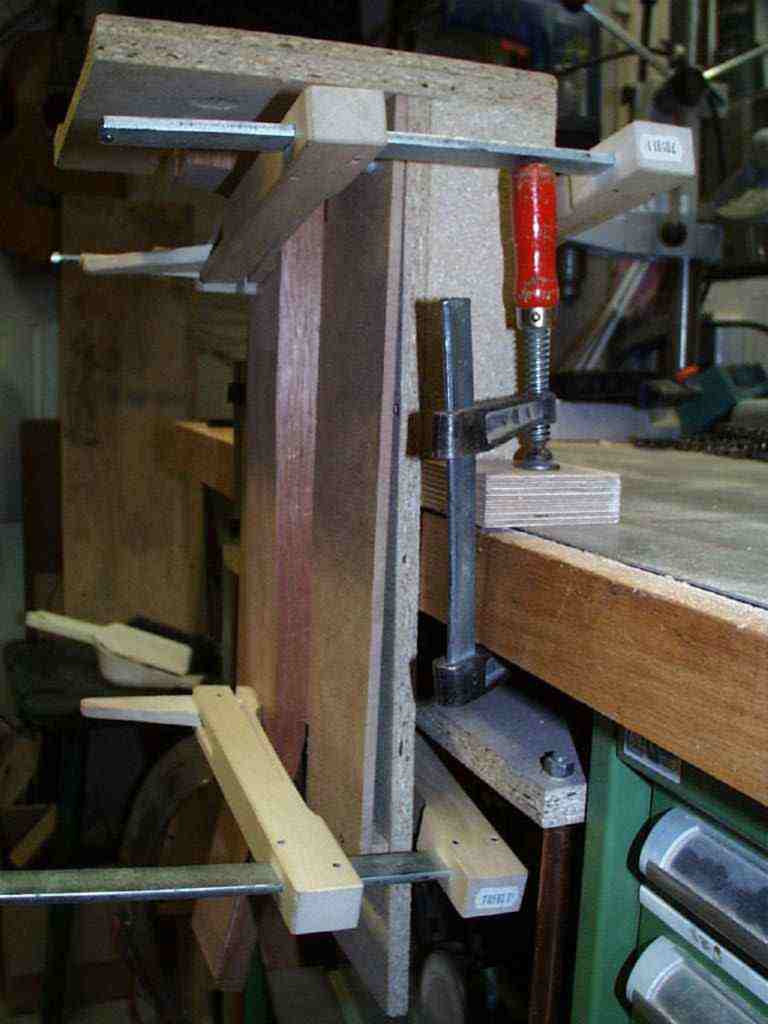
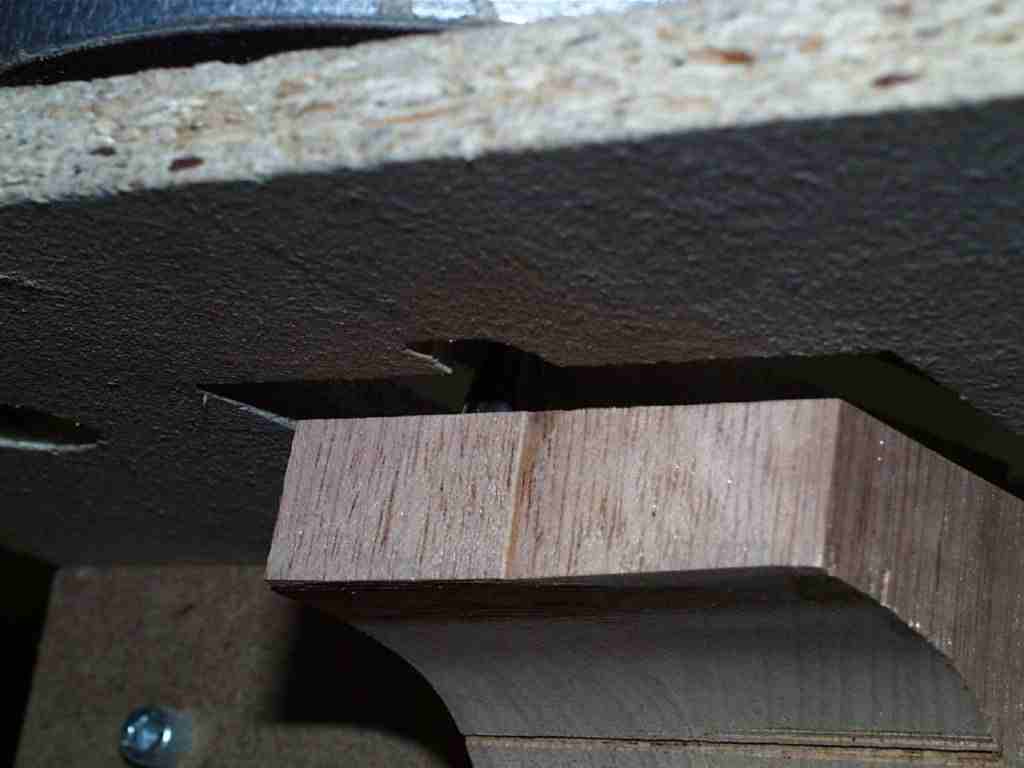
Since most steel string necks have a slope of 1-2°, the necks must be shimmed for this purpose. I do this with a 5mm thick pressboard, for centering I glued a strip on it in the width of the steel rod channel. The neck is first aligned in width and length to the centerline and then attached to the template at a distance of about 1mm. Since I have already sanded the required slope to the end of the neck, I now check the parallelism of the neck face and the template. If this is given, I set the cutter to the zinc depth of 16mm and work my way in 2-3mm layers towards the template outline.One last check and the neck is finished.
 |
 |
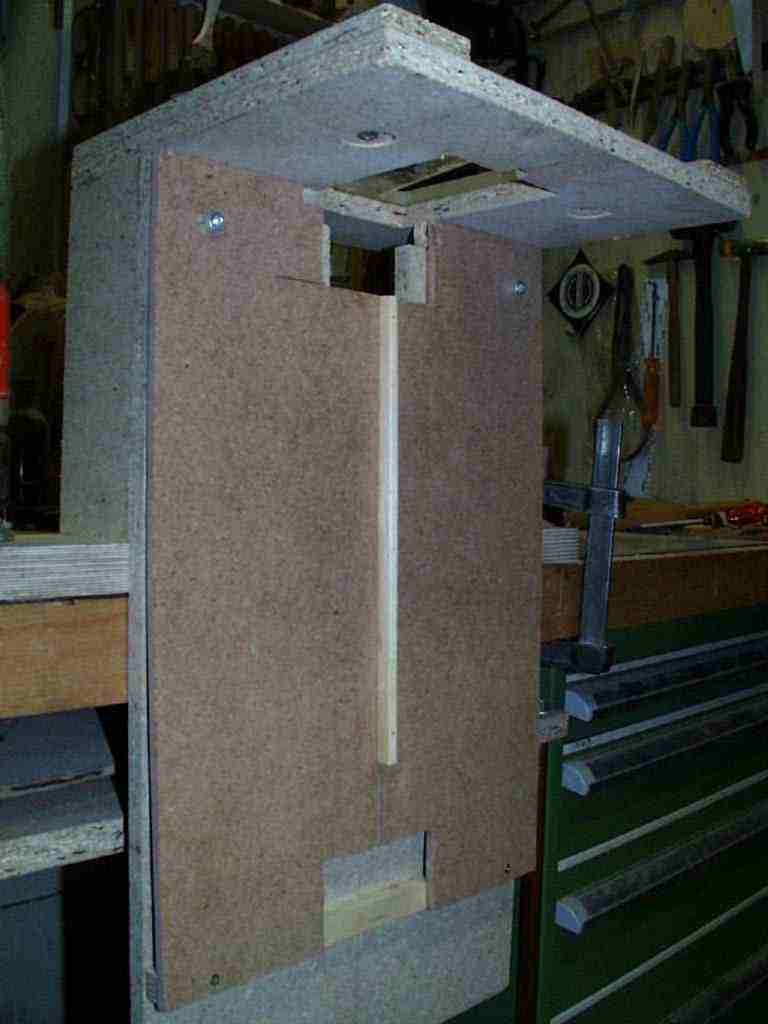 |
The milling of the guitar body is done similarly. I achieve a rough positioning with a lashing strap, which I attach to the body waist, the final attachment I achieve again via wood screw clamps and possibly wedges and small pieces of wood to place underneath. Aligning the body of the clinker both in width and length (any deviation will change the satin run and thus the bar position). Checking the parallelism of the milling surface to the template surface. It is important here that the top and the neck block including the ribs form an angle of exactly 90°, as this is the reference for the neck. Some instrument makers use a Forstner bit to drill away most of the routing beforehand, but it also works without. It should also be mentioned that milling from the solid shakes the body quite a bit, which can cause the alignment to become shaky; it is imperative that you always check the alignment using auxiliary markings, for example.
 |
 |
 |
 |
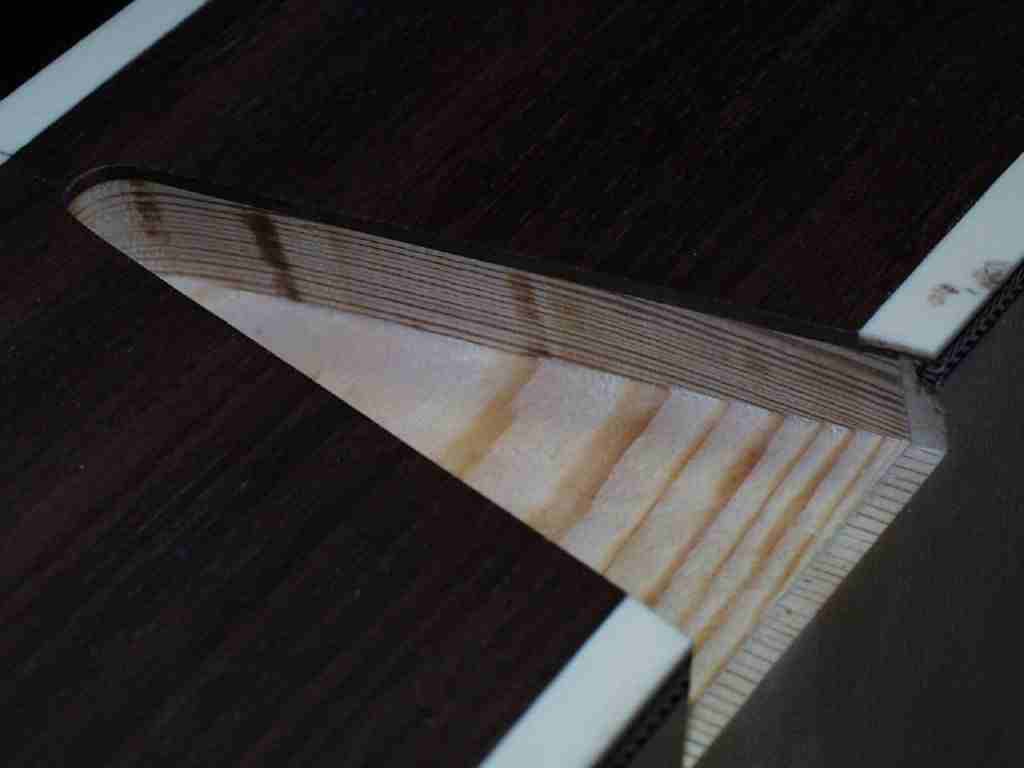
Here are two more results, one a finished neckline and the corresponding dovetail on the neck itself. If you cut away the overhang and sand a little, the connection fits like a glove. Have fun with it!
 |
 |

|
Rall Guitars & Tools Hauptstrasse Tel +49 (0) 8803-48856-56 Retail Shop: By appointment only
|
Subscribe our Newsletter By subscribing our newsletter you accept our Privacy Policy and Terms and Conditions. |