Tools, parts and what you need for guitarmaking

-
Tools & Jigs
-
Tools
- Fretting Tools (Base)
- Pliers
- Sanding Blocks
- Brushes
- Files
- Routers
- Routing Templates
- Templates / Straight Edges
- Fretting Templates - Fret Scale Templates
- Clamps
- Knives
- Measuring Tools
- Tool Sets
- Reamer
- Keys, Wrenches
- Drill Jigs
- Saws
- Drill Bits
- Scrapers
- Bending Irons
- Other Tools
- Fret Hammer
- Fret Pressing
- Fretboard Protector
- Fret Bender & Tang Nipper
- ... More
- Jigs for Luthiers
-
Tools
-
Hardware & Parts
- Necks & Bodies
- Tuners
-
Hardware / Parts
- Truss Rods
- Carbon / Titan Reinforcement
- Trussrod Nuts
- Washer for truss rods
- Bridge Pins
- End Pins
- Bridges & Tailpieces E-Guitar
- Bridges & Tailpieces
- Covers
- Pickguards / Scratch Plates
- Strap Locks
- Bridge Accessories / Spare Parts
- Screws, Nuts, Washers
- Neck Attachement
- String-Ferrules
- Jack plates
- Control Plates
- String Retainer / String Trees
- knobs (pots/switch)
- Relic Parts
- ... More
- Nuts & Saddles
- Fret Wire
- Pickups & Electronics
- Materials & Supplies
- How-to
- Guitar Making
Shop Startpage Guitar Making Tools Precise Fretslotting Jig
Band Saw with Digital cale
Here I give some basic knowledge about fret sawing and show a saw I designed and built for sawing the frets into the fretboard.
There are numerous methods for sawing slots into the fingerboard wood. On the one hand, one distinguishes the "hammering method" from the "gluing method". In the hammering method, the slots are a few hundredths larger than the foot of the fret wire and the small barbs of the fret wire are used to ensure a secure fit of the fret bar. In the gluing method (which is used for repairs, depending on the belief), the slots for the frets are cut so large that the foot of the fret wire falls in easily but cannot wobble sideways. You get the strength by gluing the rods with epoxy (iiih, so depending on the glaben). Basically you have three parameters that influence a good slot:
- exact location
- Slot width
- Slot depth
Depending on the scale length used, the positions on the fingerboard change. Since the old masters worked with simple saws, compasses and rulers at that time and one got melodious tones from these instruments, I think that an accuracy of ±0.075mm per fret bar (absolute) corresponds to today's requirements and is perfectly adequate.
The slot width depends of course on the fret wire used. You simply measure the base of the wire without barb with a caliper and come out at about 0.6mm. I would use a width of 0.65mm here. Depending on the saw blade and sensitivity, a saw blade thickness of 0.5 can also come out at 0.65. One should absolutely make tests to it. If the wire can be easily levered out with the fingernail, the slot is too wide, and if you have to hit it hard when tapping it in, the neck will be bent very badly backwards afterwards, because every wire that is driven in puts the neck under tension like a wedge. With a simple feeler gauge, you can then measure the slot width and vary the saw blade thickness accordingly.
The ideal slot depth is achieved when the foot of the wire just does not touch the bottom of the slot after insertion. Since most modern steel string guitars today have arched fingerboards, most manufacturers do not have a uniform depth anyway due to the manufacturing process. This is because you saw straight through the wood in one set, so you have the ideal depth at the outermost fretboard sides and an air gap of up to 1.5mm at the center of the arching. As a result, you lose sustain on the one hand and stiffness of the neck on the other.
There are also different sawing techniques . If you only build one scale length at a time, a motor-driven shaft with circular saw blades of about Ø100mm in the right thickness lined up at the right intervals is an excellent choice. On a sliding carriage, you move the fingerboard over all the saw blades at once - done. Another method is the circular saw: you cut each slot individually by attaching a Plexiglas template to the top of the fretboard. After each slot, you simply move the template (available at special mail order). A manual method is on the hand saw jig (miter saw). Again guided by a template and pin, one offsets the fingerboard after each slot only that one saws the slot by hand with a fine saw. My method is sort of a combination, it doesn't move the wood, it moves the saw sideways. Over some time I have also developed the device. Both variants work excellently, with the first one you just have to saw by hand, with the one described below nothing has changed in the principle setup, only that I have added a motor and the fine adjustment is much easier.
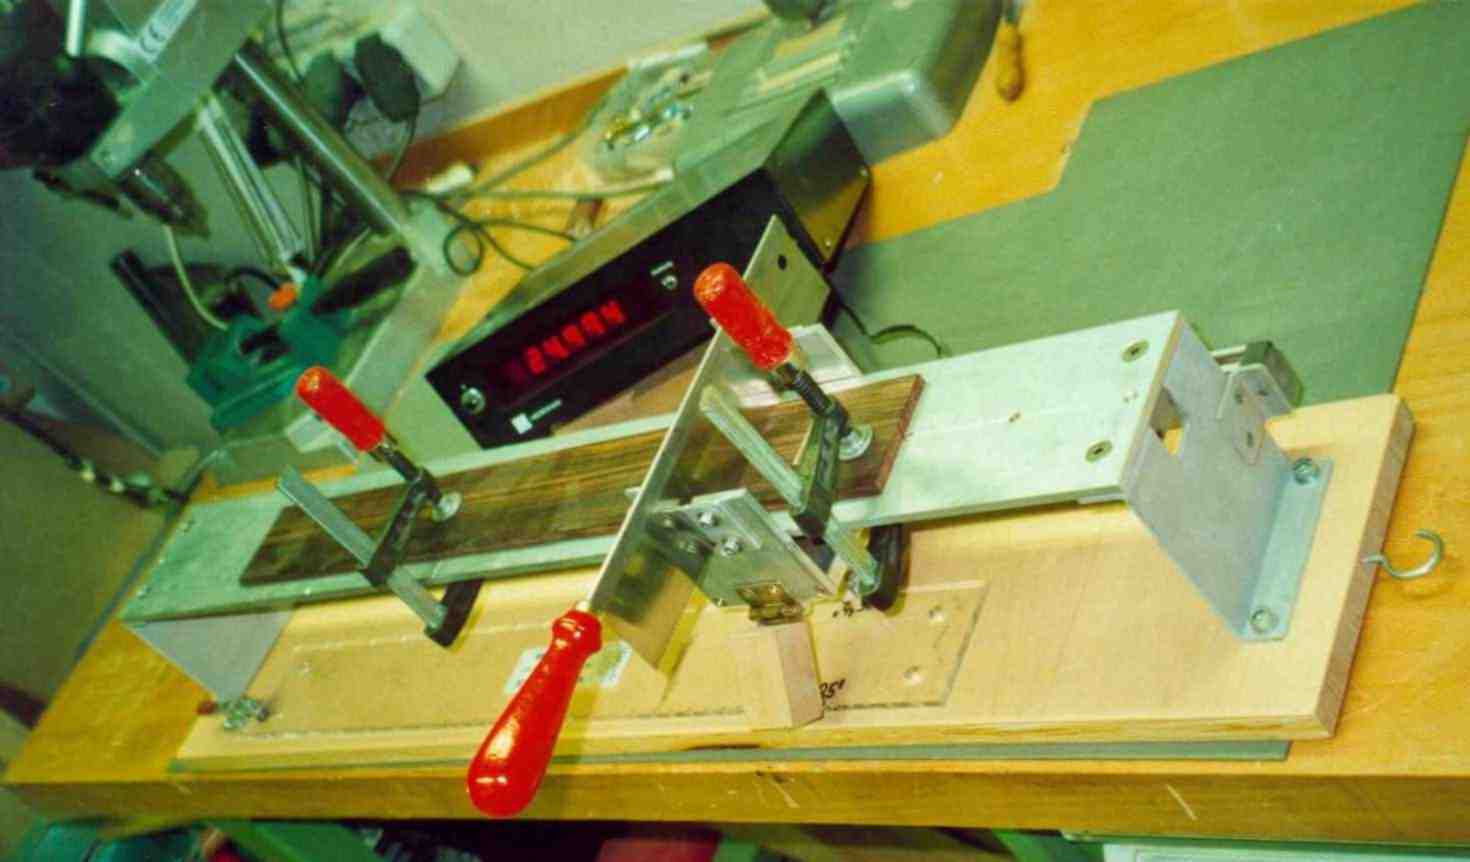
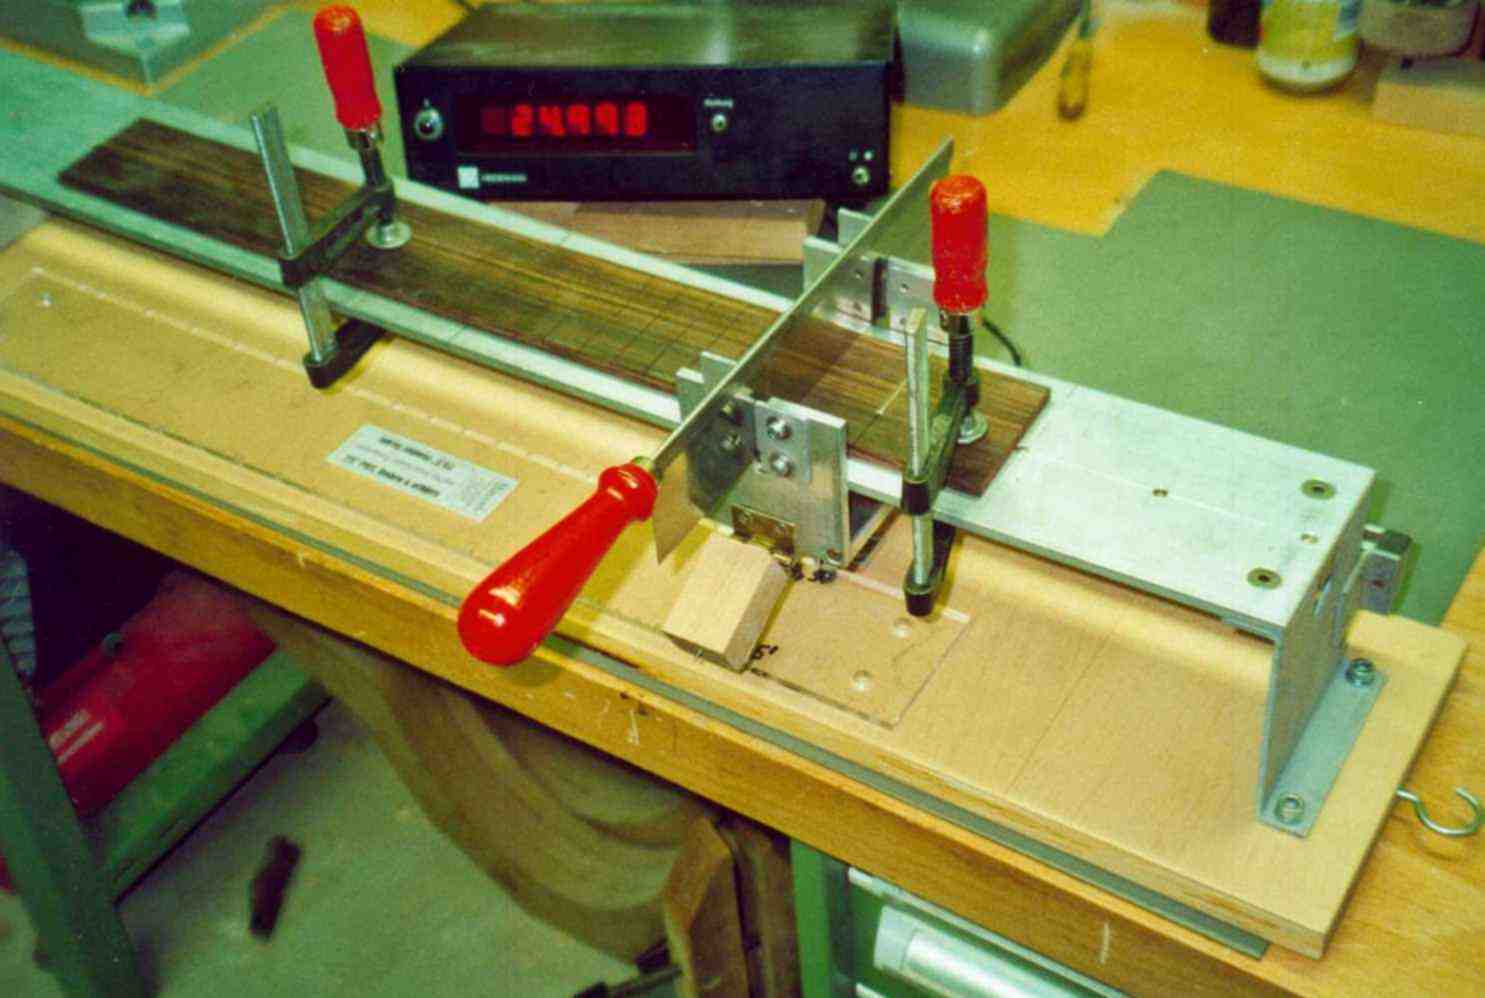
Construction I:
Wooden base plate, linear axis on the bottom. The saw guide is attached to the guide carriage (laterally and in height). The guide carriage has a connection to a stationary digital scale from a tooling machine. Using a readout device, I can determine and approach any position. I have made a table for the most common scales and place the carriage at the position and clamp the carriage with a wing nut from below. It is quicker if I use a plexiglass template. I clamp this onto the wooden base plate and use a pivoting wooden block with a matching pin to move to the required positions.
 |
 |
 |
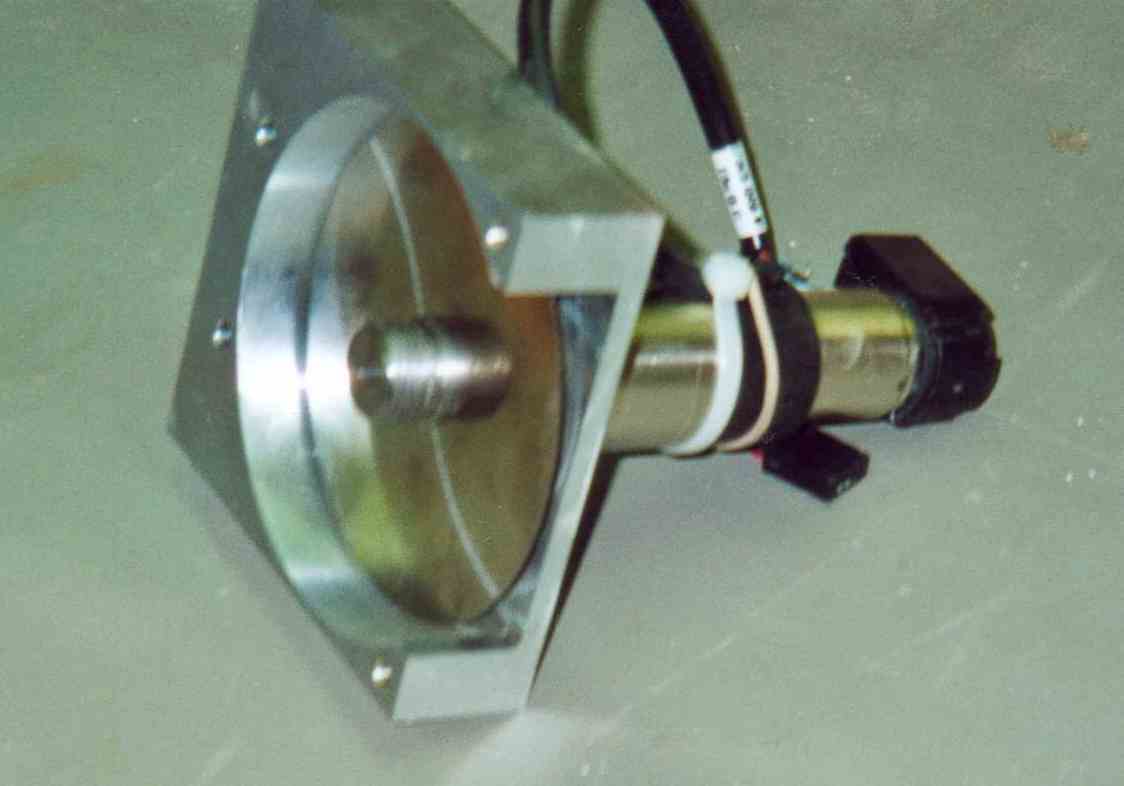
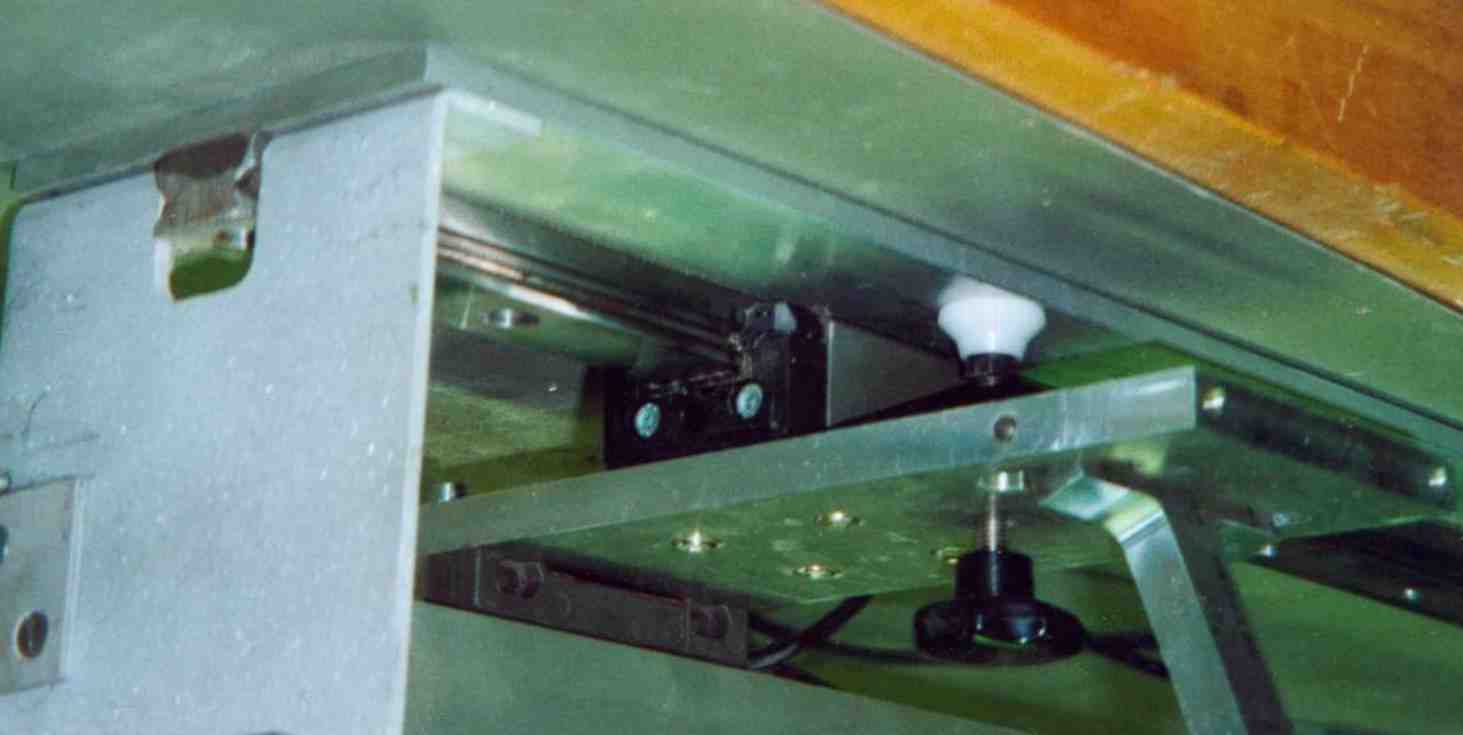
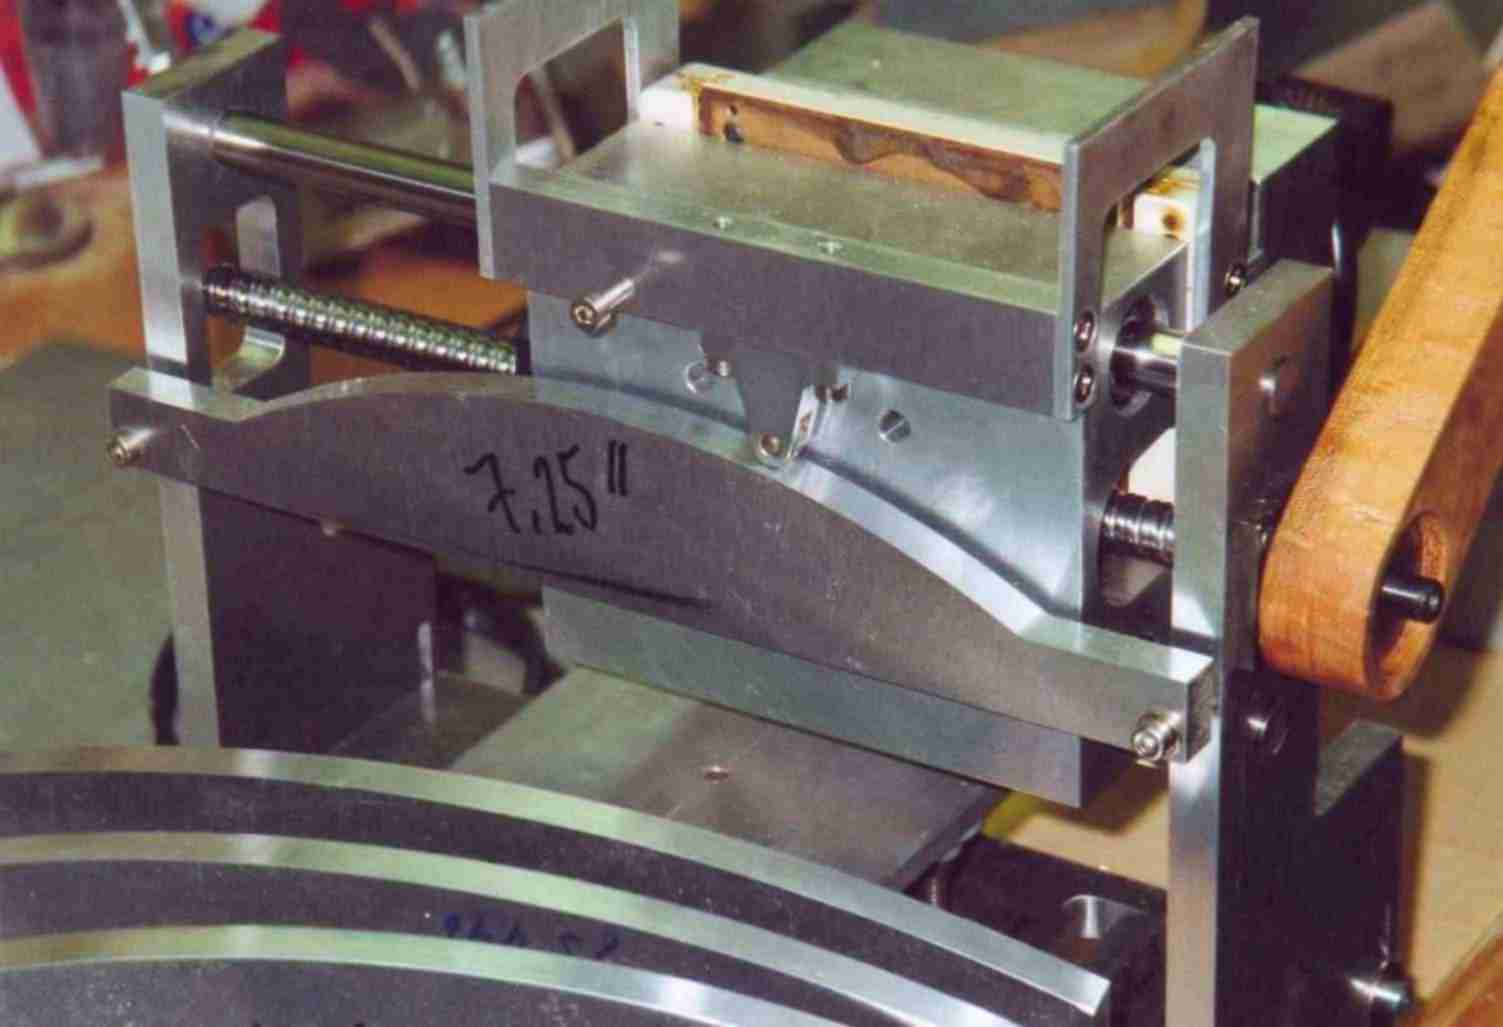
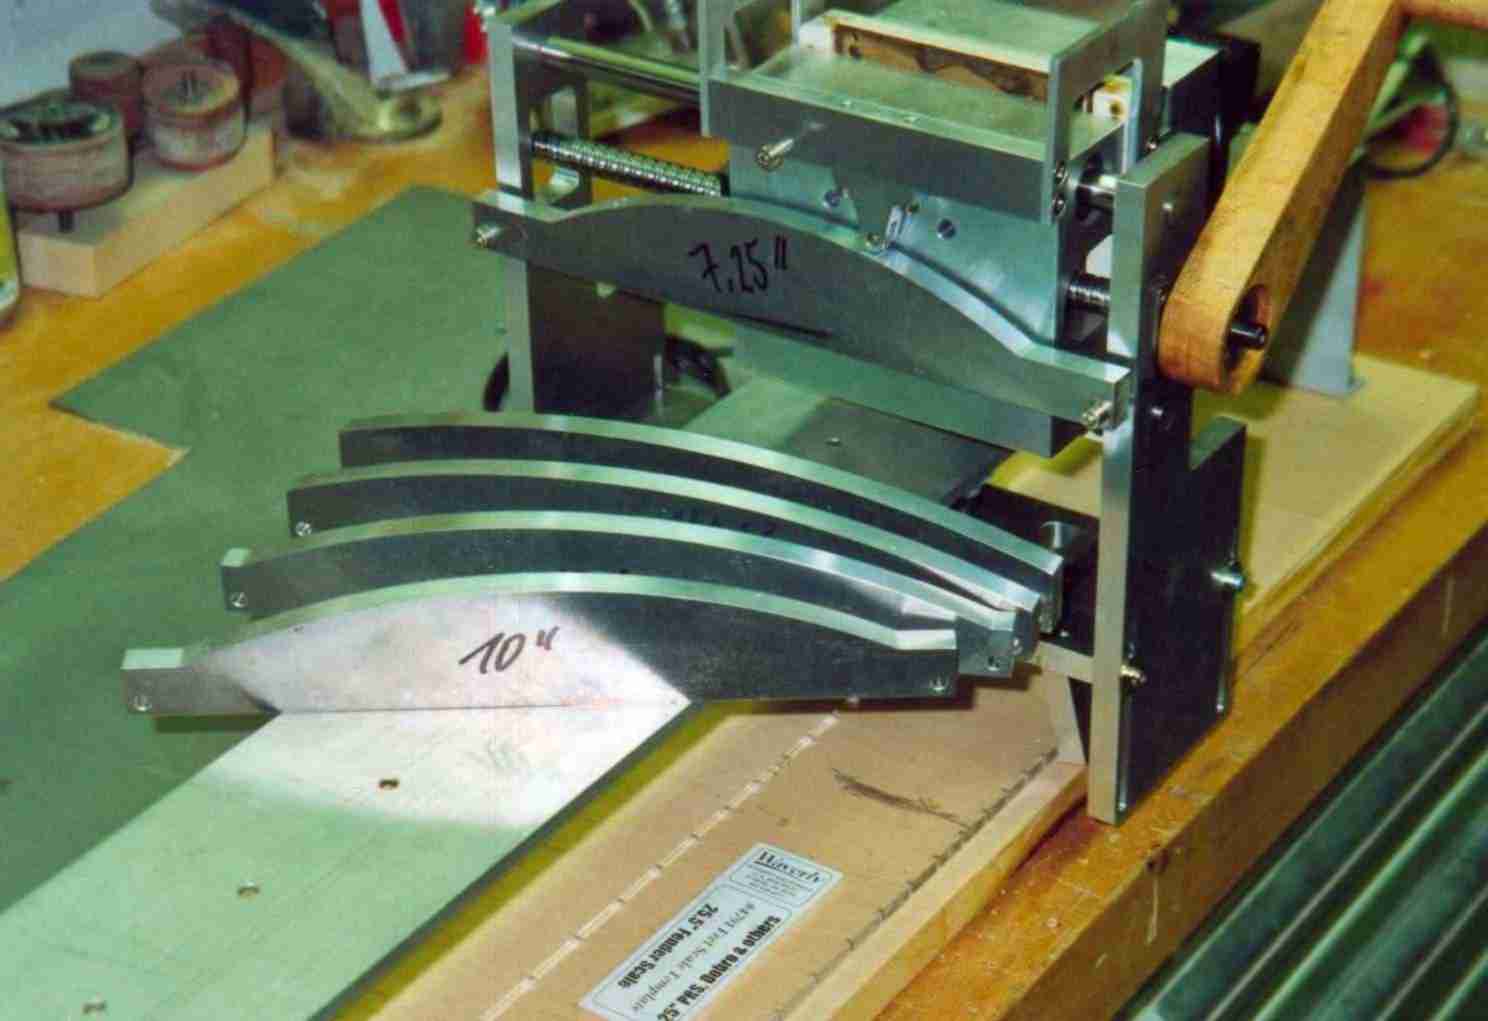
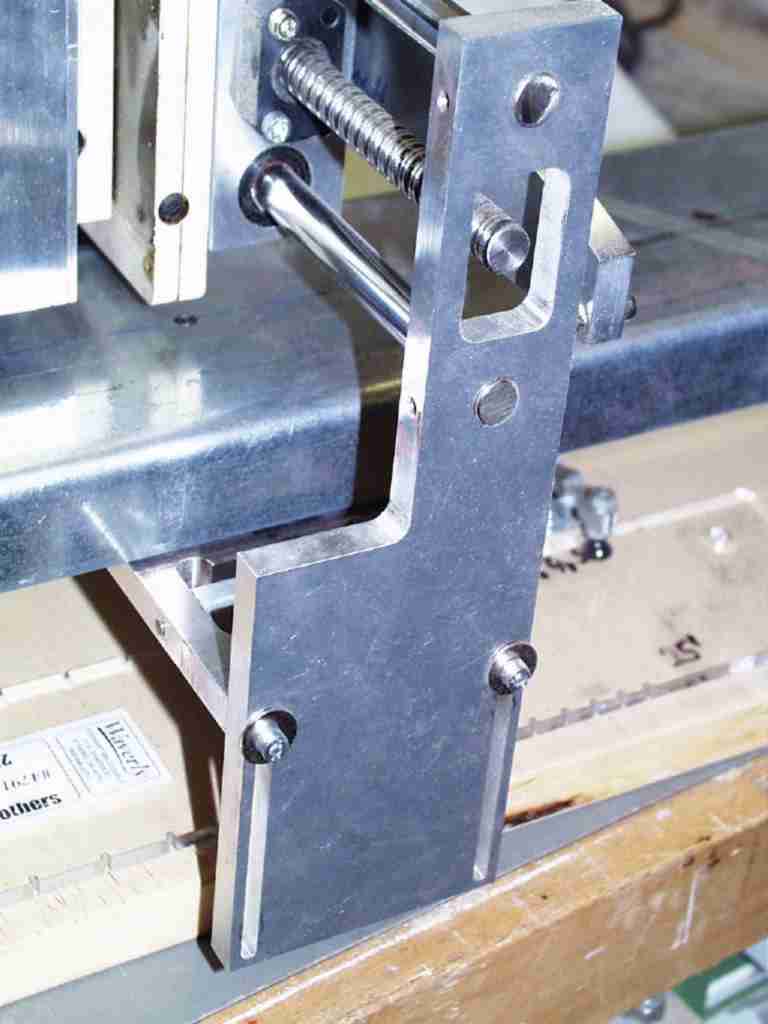
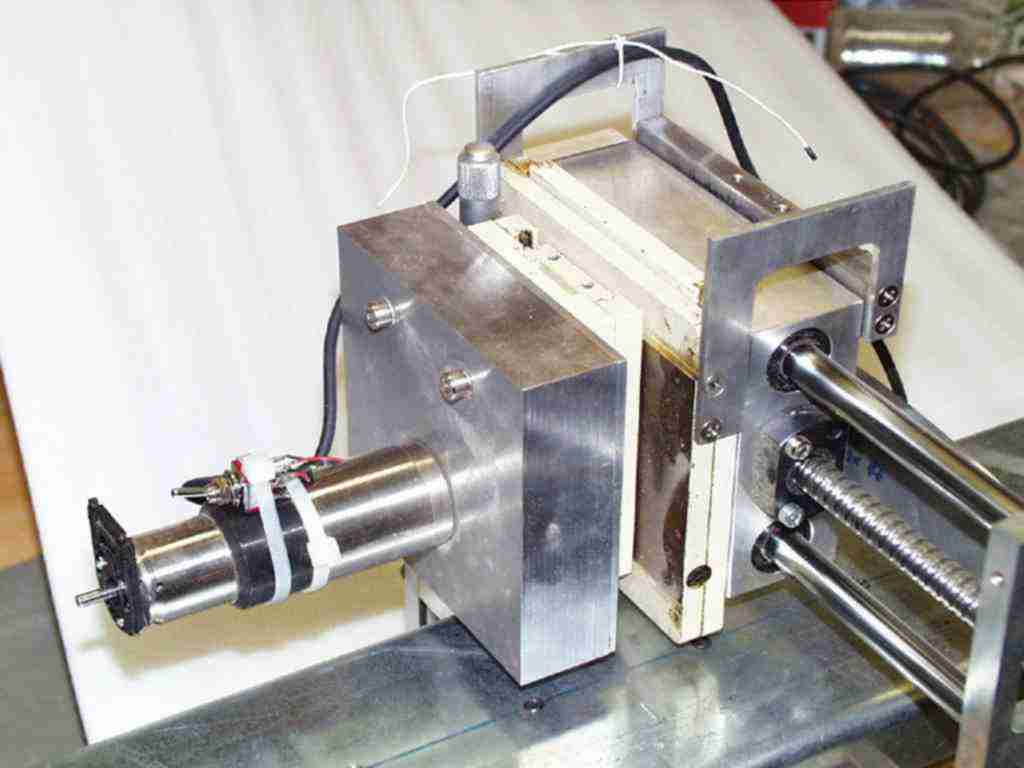
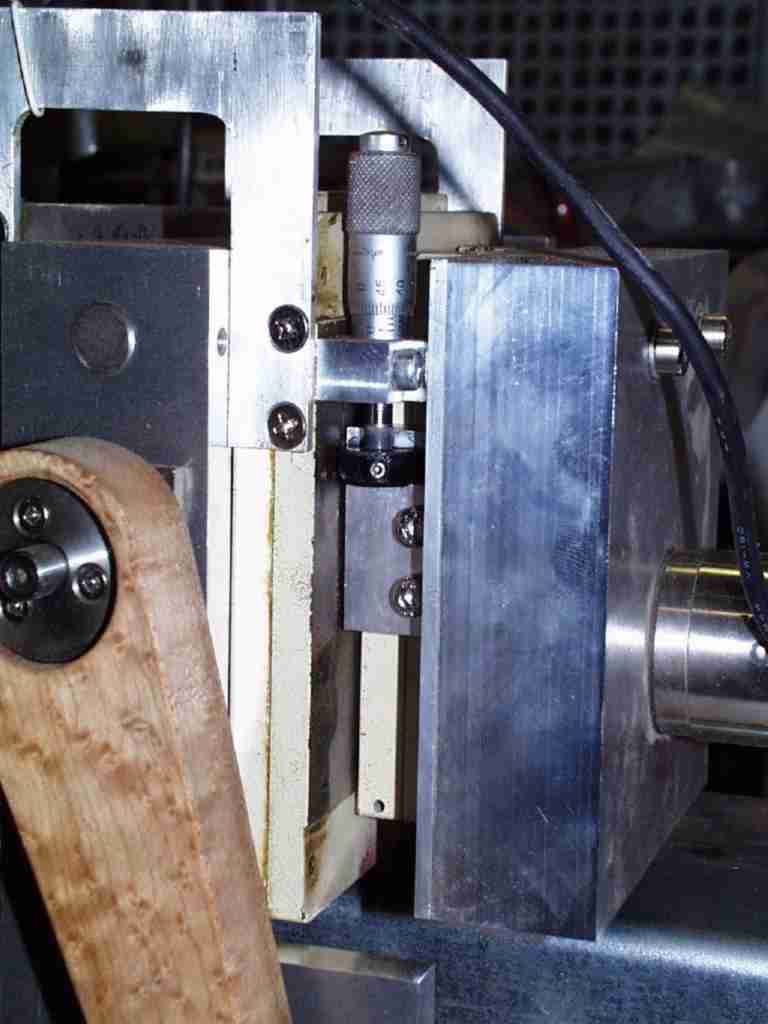
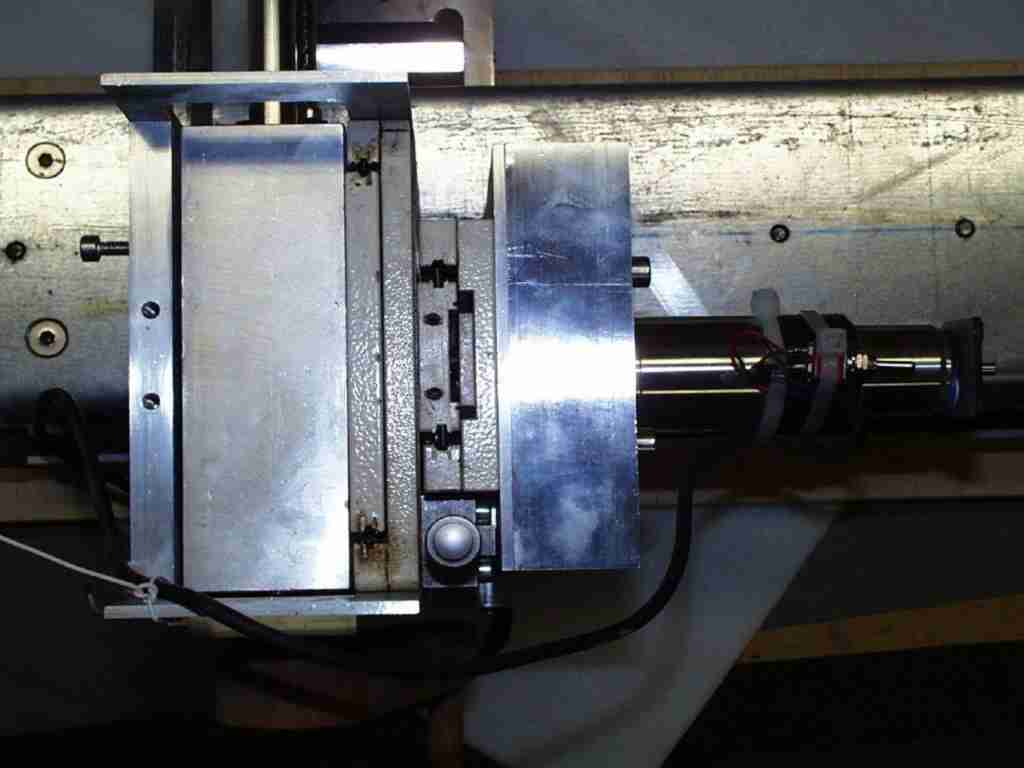
Structure II:
Wooden base plate, linear axis on the bottom as described above only that I added some improvements:
- Motor driven
- Slot depth adjustment via micrometer screw
- Slotting depth variable, as saw blade is guided over bolster
- Both fingerboards and whole necks can be glued in place
- Cross support spindle driven
- Clamping improved
The construction took me a few days and the production on CNC machines as individual pieces are also not exactly cheap. But when I saw the saw image, felt the strength of the finished neck, I knew that the investment was worth it.
 |
 |
 |
 |
 |
 |
 |
 |
 |
 |
- Fix fingerboards with double-sided adhesive tape
- When sawing by hand, wood tends to tear out on the butt side of the saw (plane to final dimension afterwards)
- Instead of a digital scale, you can also use a converted caliper with vernier scale in the appropriate length (cheaper).

|
Rall Guitars & Tools Hauptstrasse Tel +49 (0) 8803-48856-56 Retail Shop: By appointment only
|
Subscribe our Newsletter By subscribing our newsletter you accept our Privacy Policy and Terms and Conditions. |